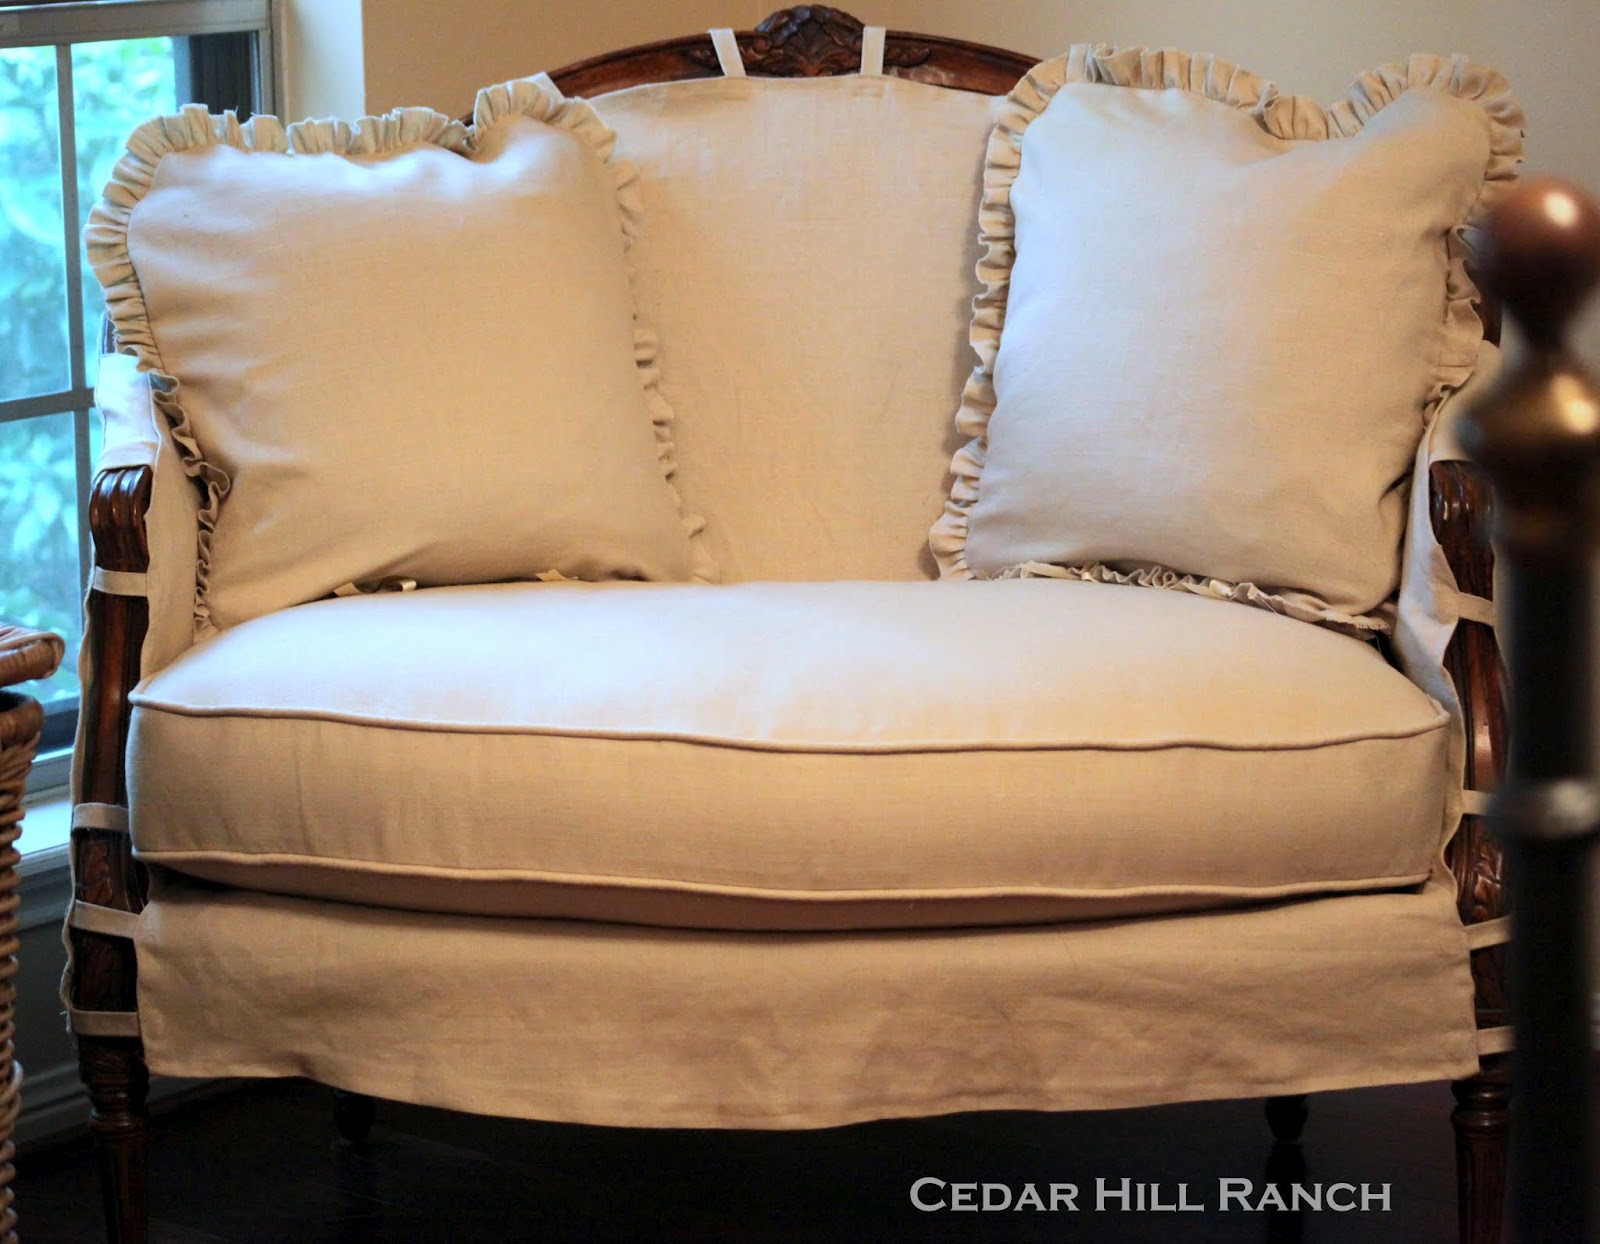
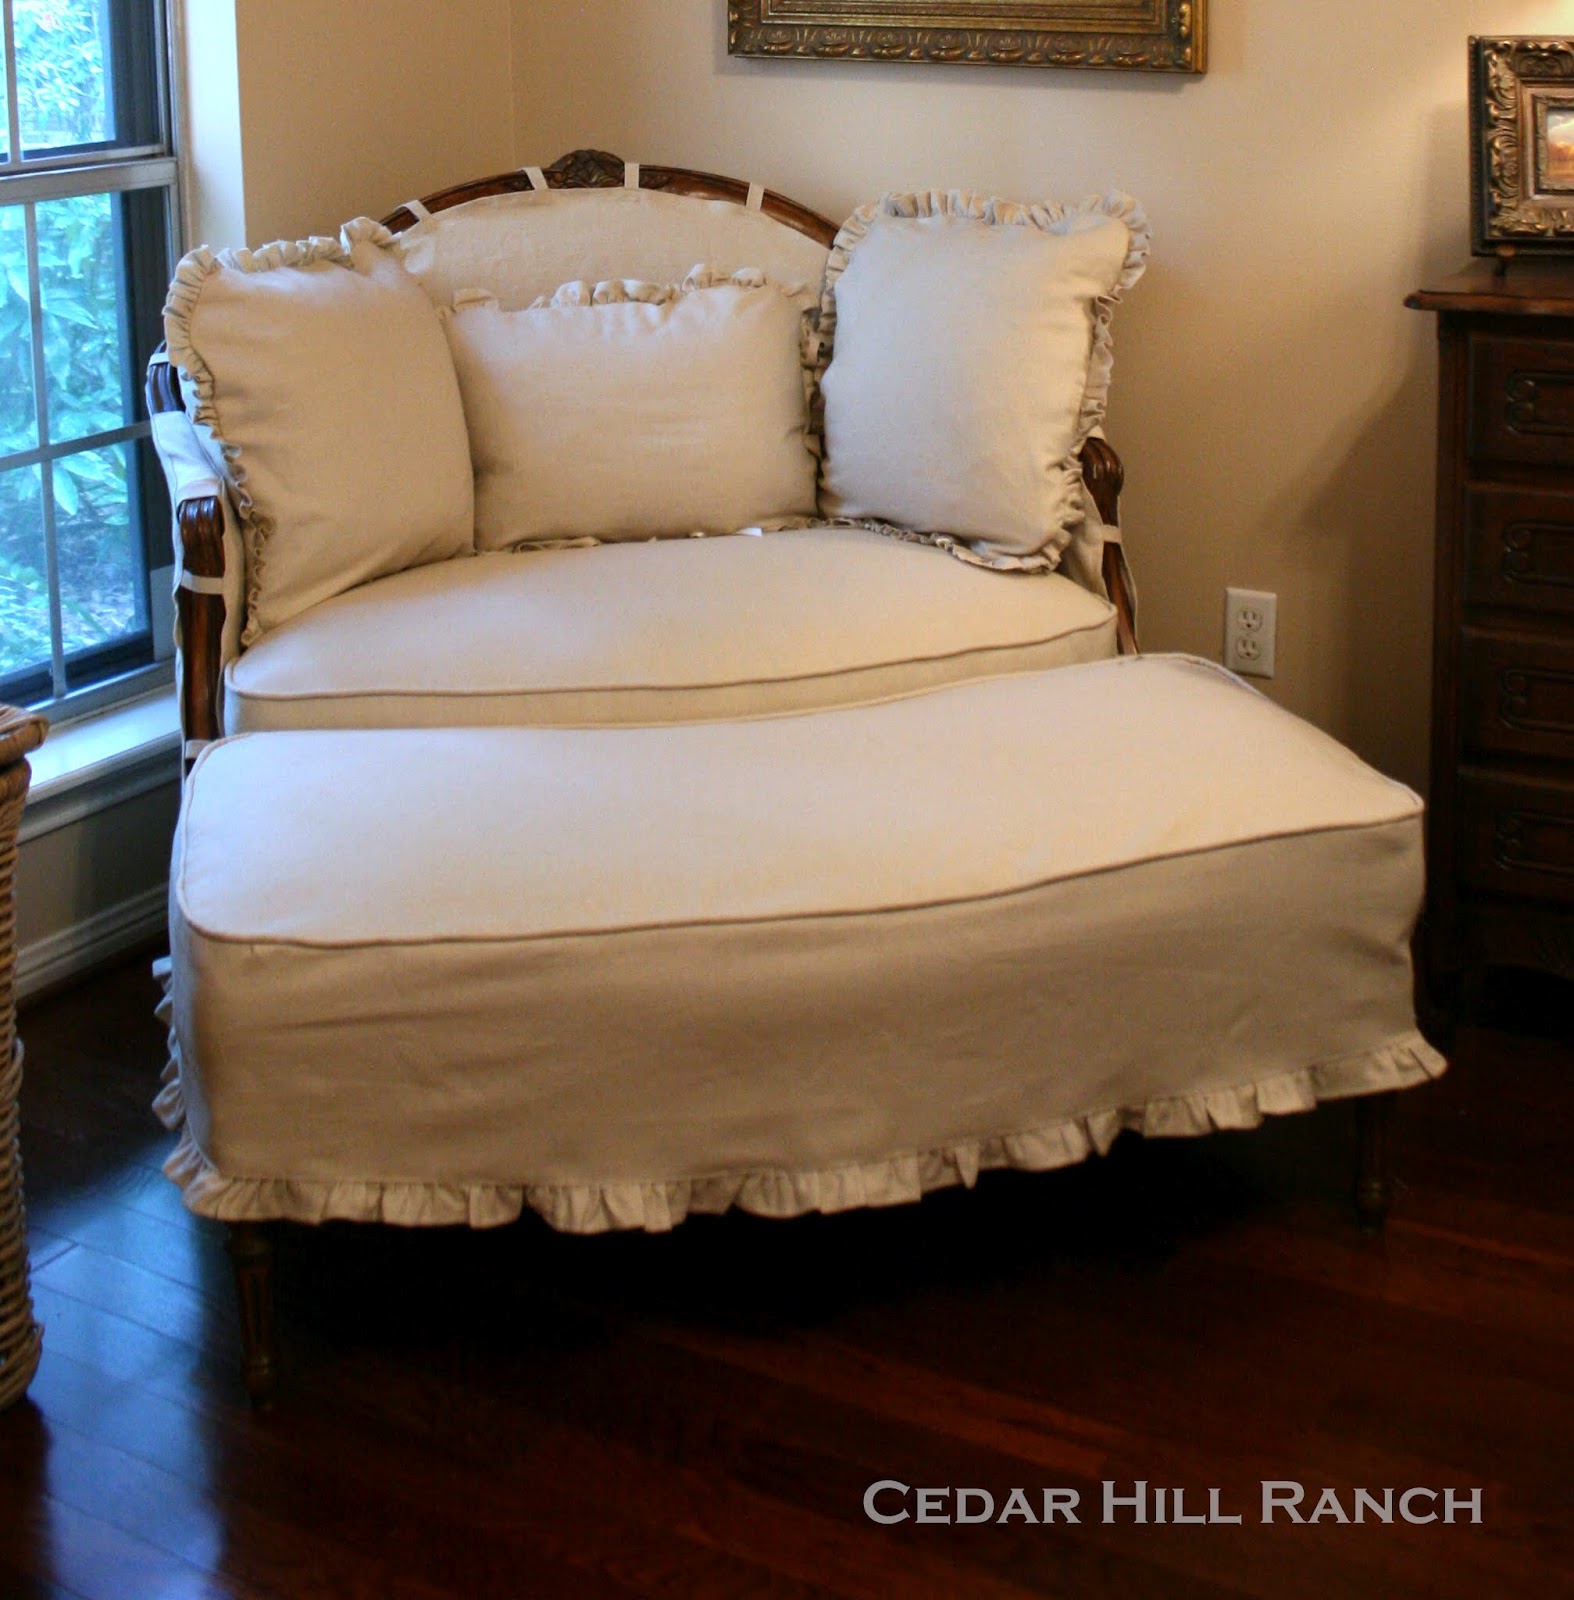
I have sewn many, many slipcovers in my day, sofas, club chairs, little dining chairs, a loveseat, and even several wing chairs, but never did I have a challenge like this one. Let’s call her Colette.
She’s gorgeous, curvy, and not easy to sew for. People ask me all the time how I make slipcovers, so I’m going to show you today.
Nobody showed me how to make slipcovers, but I found a book one time that talked about how to make them. I read one sentence, and a lightbulb went on in my head. It basically said to think of your chair as your dress form. So if you have the chair or whatever in front of you, you simply use the furniture to pin your fabric to, while you are determining where seams should be. If you don’t know what I mean, just follow along. I can show you better than I can explain it.
The first step is to look at the piece and figure out how I will piece the slipcover together. I try to use the design of the piece as much as possible, making the slipcover as much like the upholstery as I can.
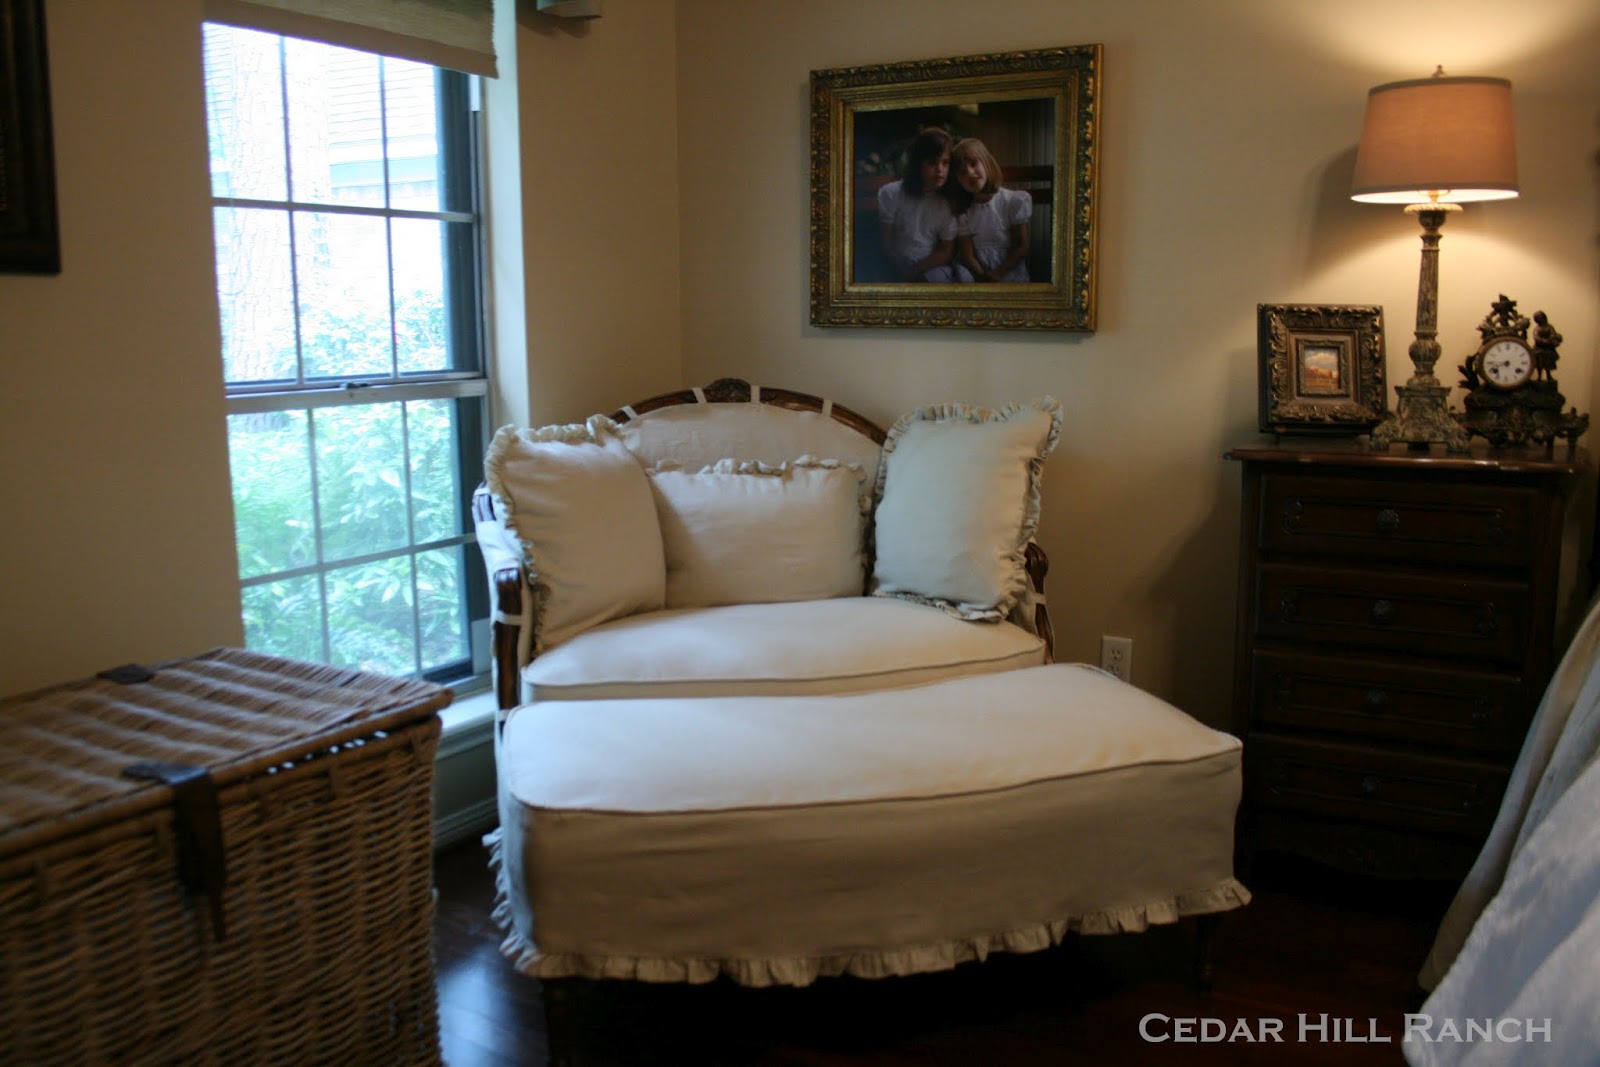
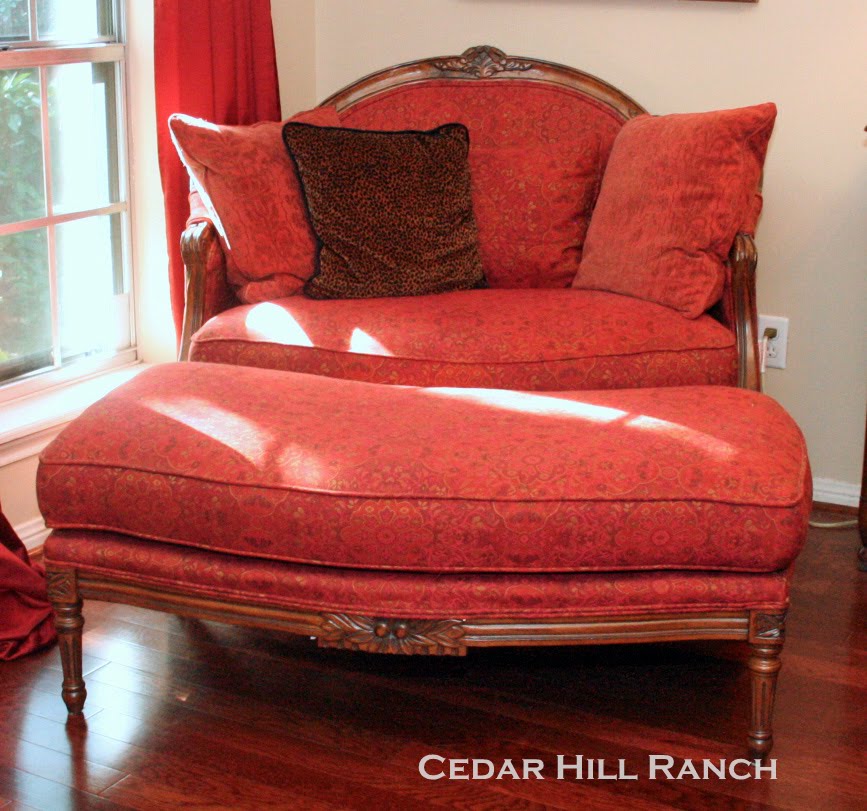
Here’s what my settee and ottoman looked like before.
Then, I sketch the piece of furniture and label every surface. I’m using a photo rather than my sketches since it is easier to see what I do with the photos.

I walk around the piece of furniture and draw a representation of every piece of fabric that will go on the settee and label each piece as I have shown. For this piece of furniture, there were several more pieces of fabric needed that you can’t see in this photo, like the fabric on the back of the settee, the bottom of the cushion and the fabric that goes on the settee under the cushion.
Next, I measure each piece at its largest point and add to that for seam allowance and error. I now have height and width dimensions for each piece of fabric that I will need. Then I draw a rectangle representing my fabric that I will be purchasing, and start drawing the pieces of fabric to see how much fabric I will need. I always add in a few yards for piping, ruffles, etc. BTW, I found this beautiful linen fabric on sale for half off!! Splendid!! Here are some of my notes.

Okay, they aren’t pretty, but hopefully you can get a feel for what I do to calculate the yardage needed.
I had already purchased some linen fabric I used for my roller shades, click here. I loved the fabric so much, I went back and decided to buy enough fabric to slipcover my settee, ottoman, and make a bed covering. When I went back, the fabric was 50% off. All I can say, is “Come to Mama!” The 50% came in handy since I purchased 20 yards for the bed, settee, ottoman, and pillows. I think I used 6 yards for the valences and shades.
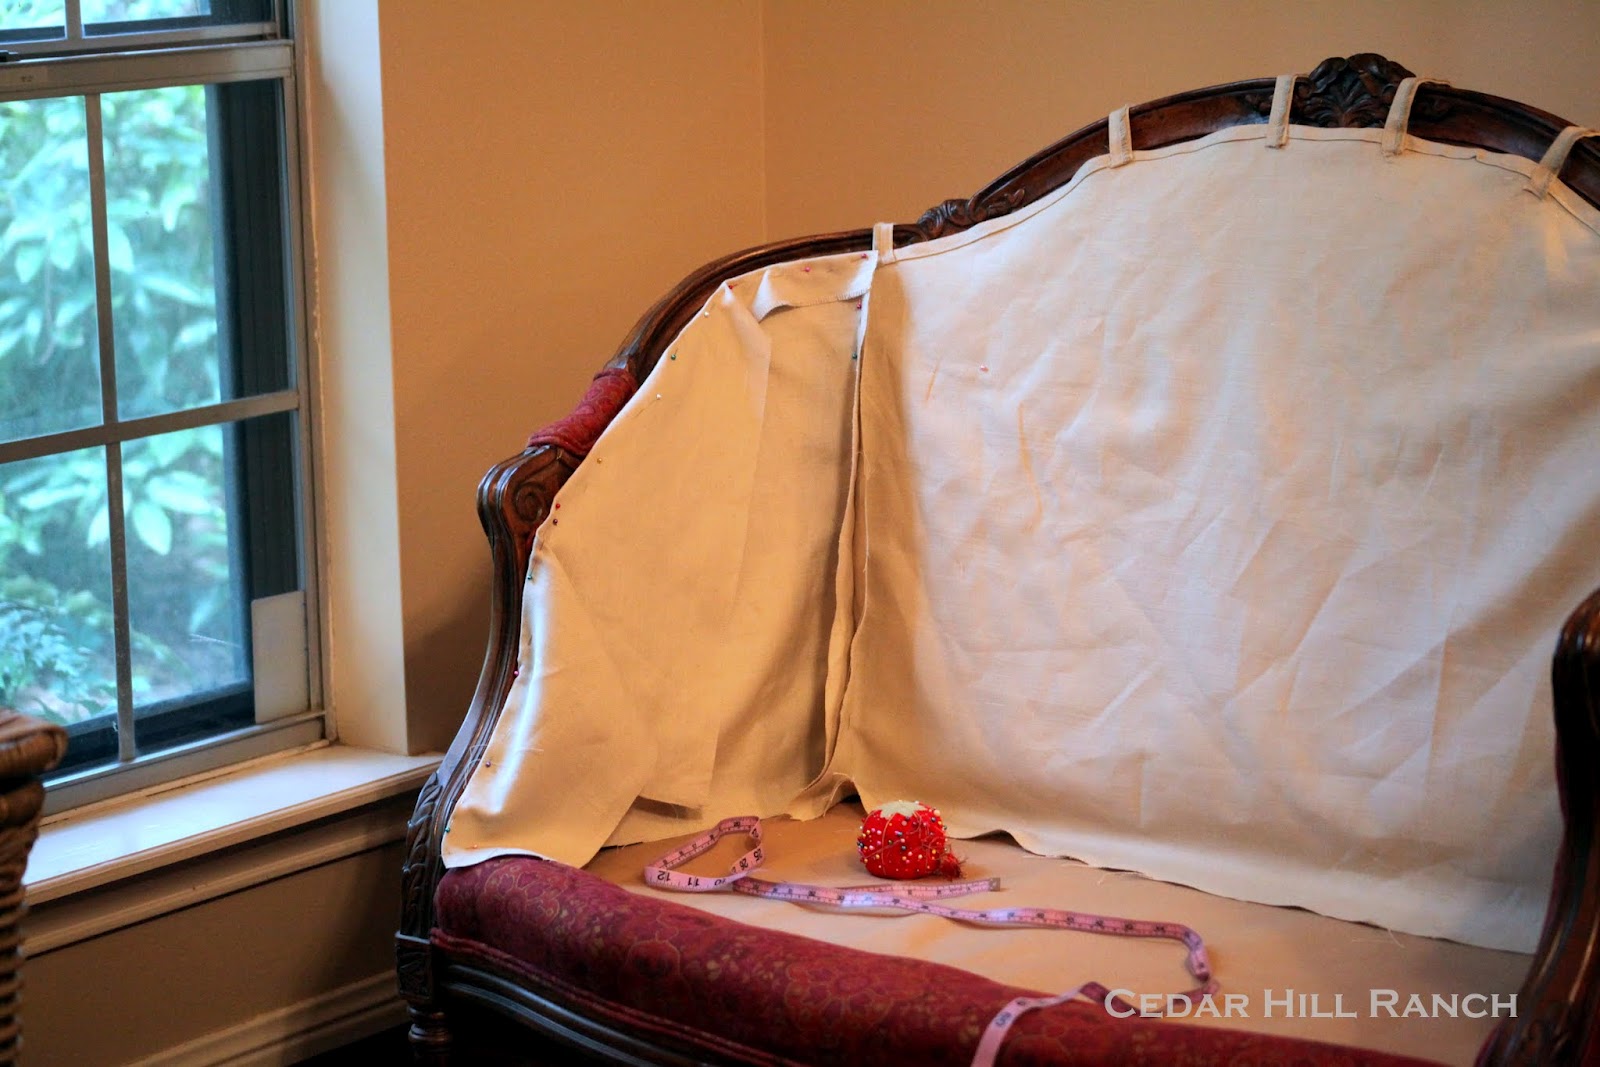
After I purchased my fabric, I cut out a square for my “A” piece first, which is where I always start, with the front center piece. Then I pinned it onto Colette, sorry Baby.
Next, I carefully folded the fabric back as I followed the curve of the settee back. I made sure the fabric would cover the red fabric and I also covered up about 1/2 inch of the wood, to give myself some elbow room, meaning if someone sits in it, the fabric can shift a little without showing the red fabric. For most pieces of furniture, this isn’t a problem since you won’t have straps at the top, but Colette, she is a French woman, and therefore more complicated.
Now that I know where the seam will be, I trimmed the fabric. I use 1/2 inch seams, although the standard sewing seam is 5/8 inch. So it wouldn’t fray along the top, I fold the seam over twice, so that meant I needed 1 inch along my top seam.

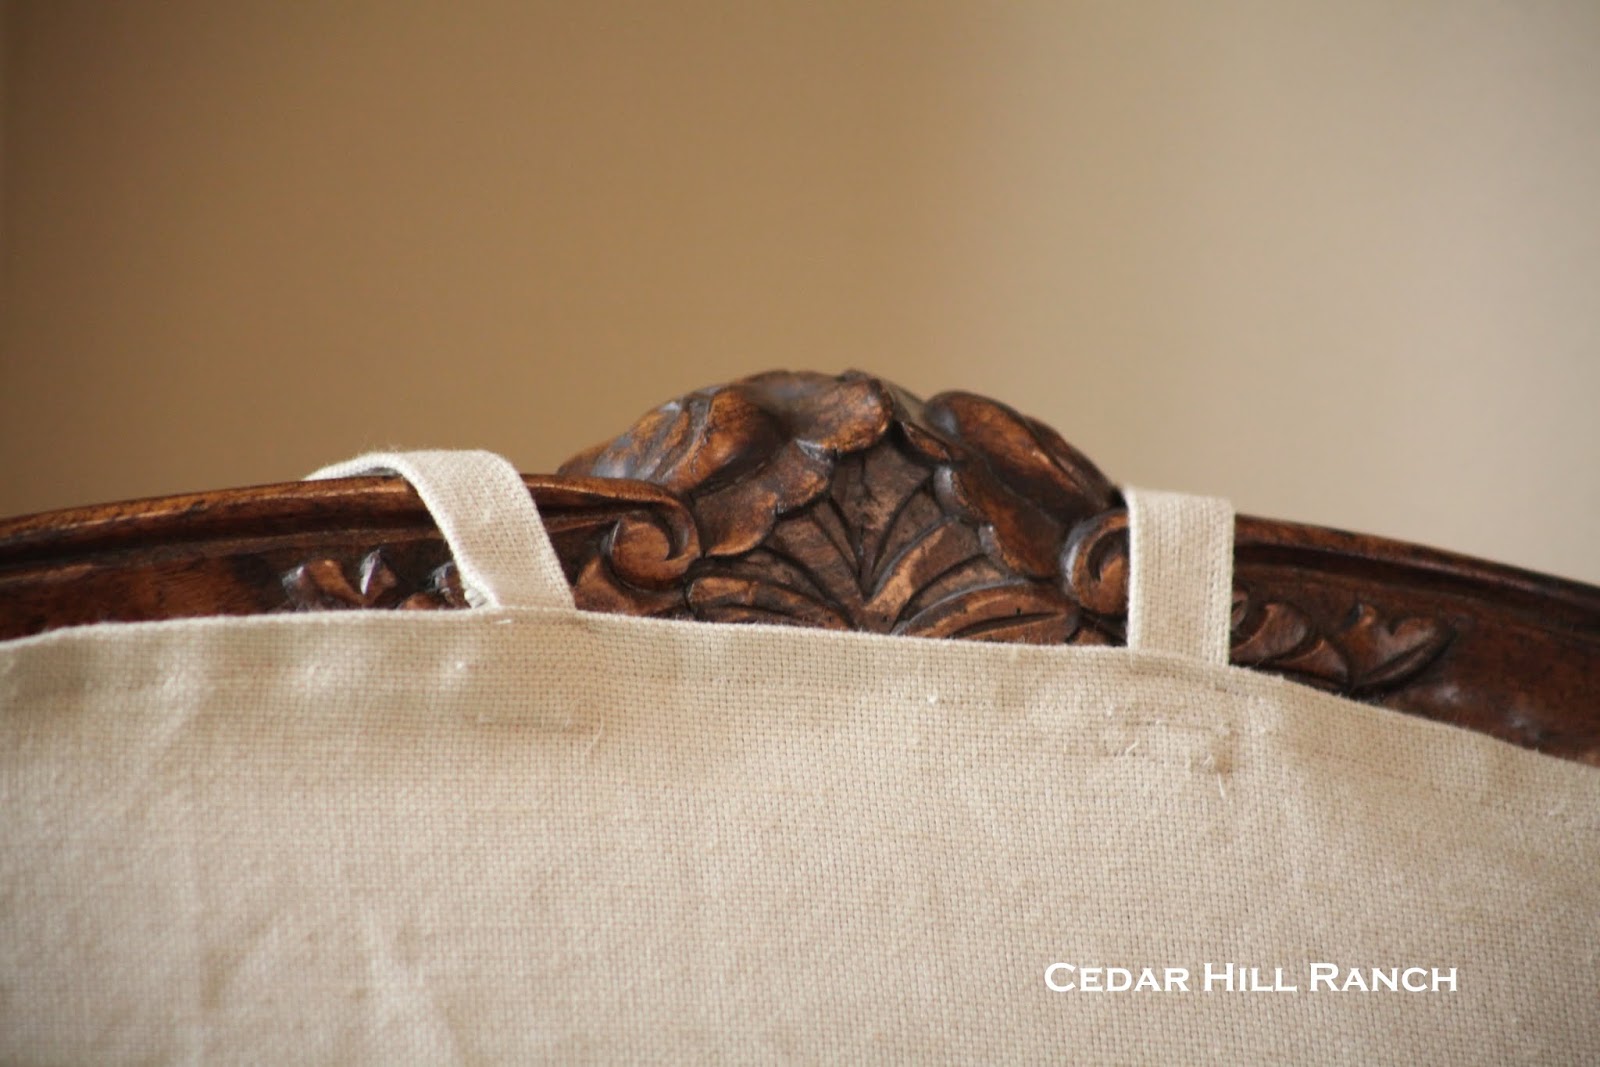
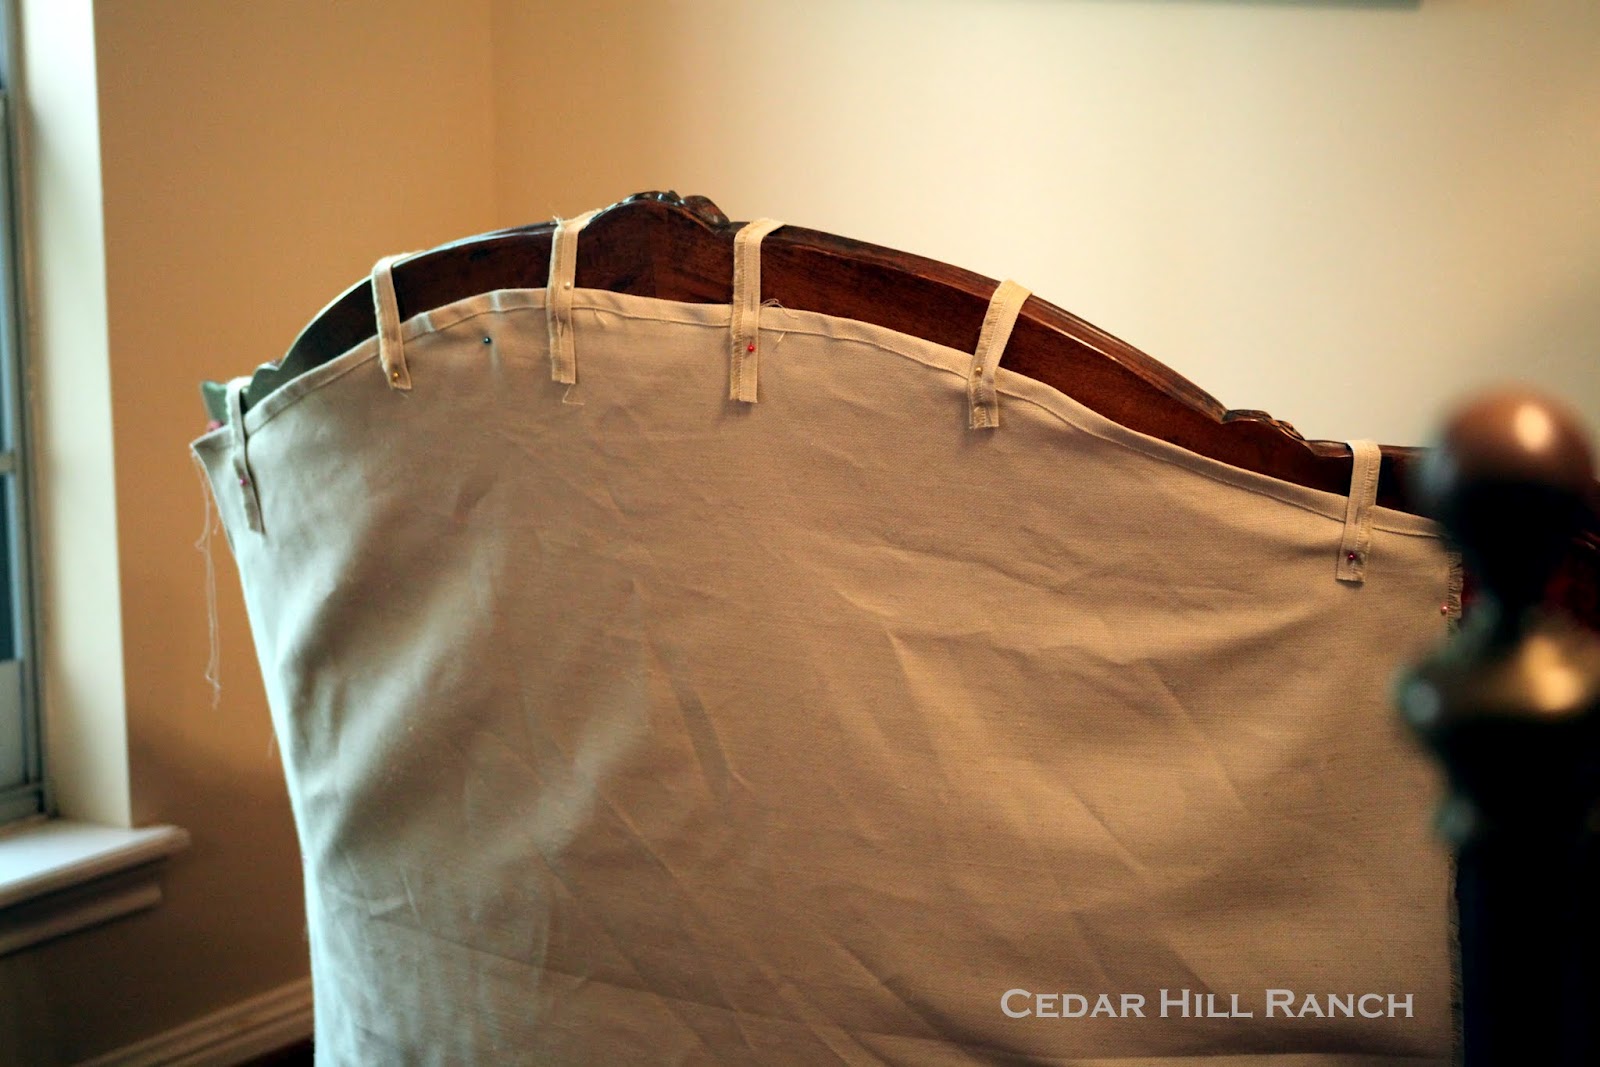
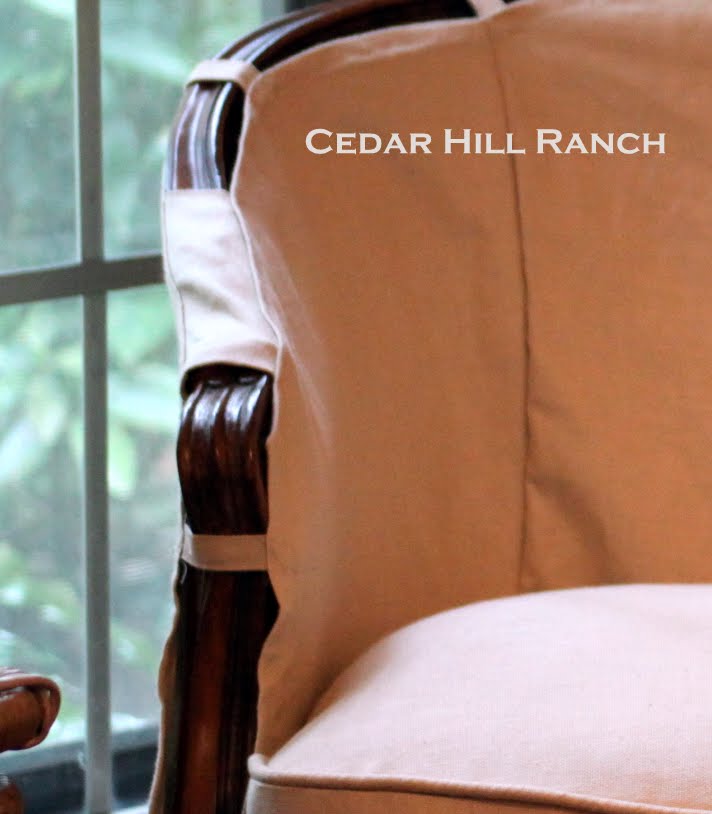
I made straps next so Colette could have a strappy dress. We want to show as much of her adorable wood body as possible while being modest enough to cover her red “underwear”.

I didn’t know how many straps I would need, so I started with a few and added as I saw gaps. We don’t want anyone looking down Colette’s dress, do we?
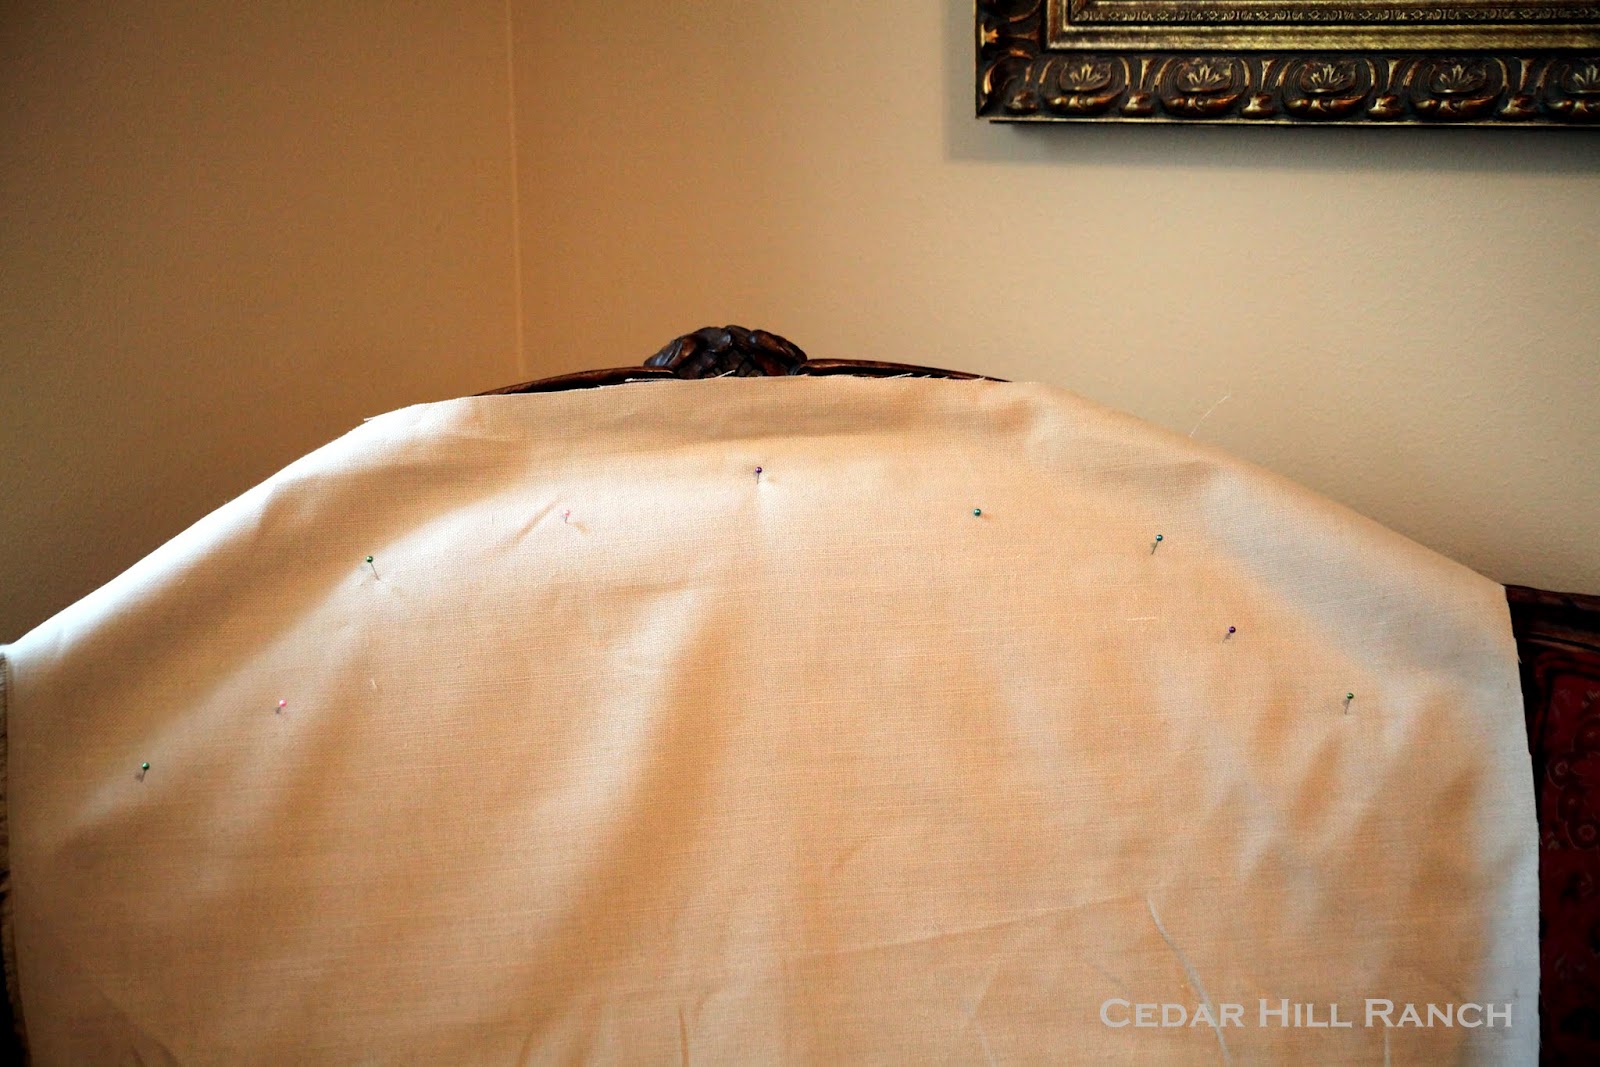
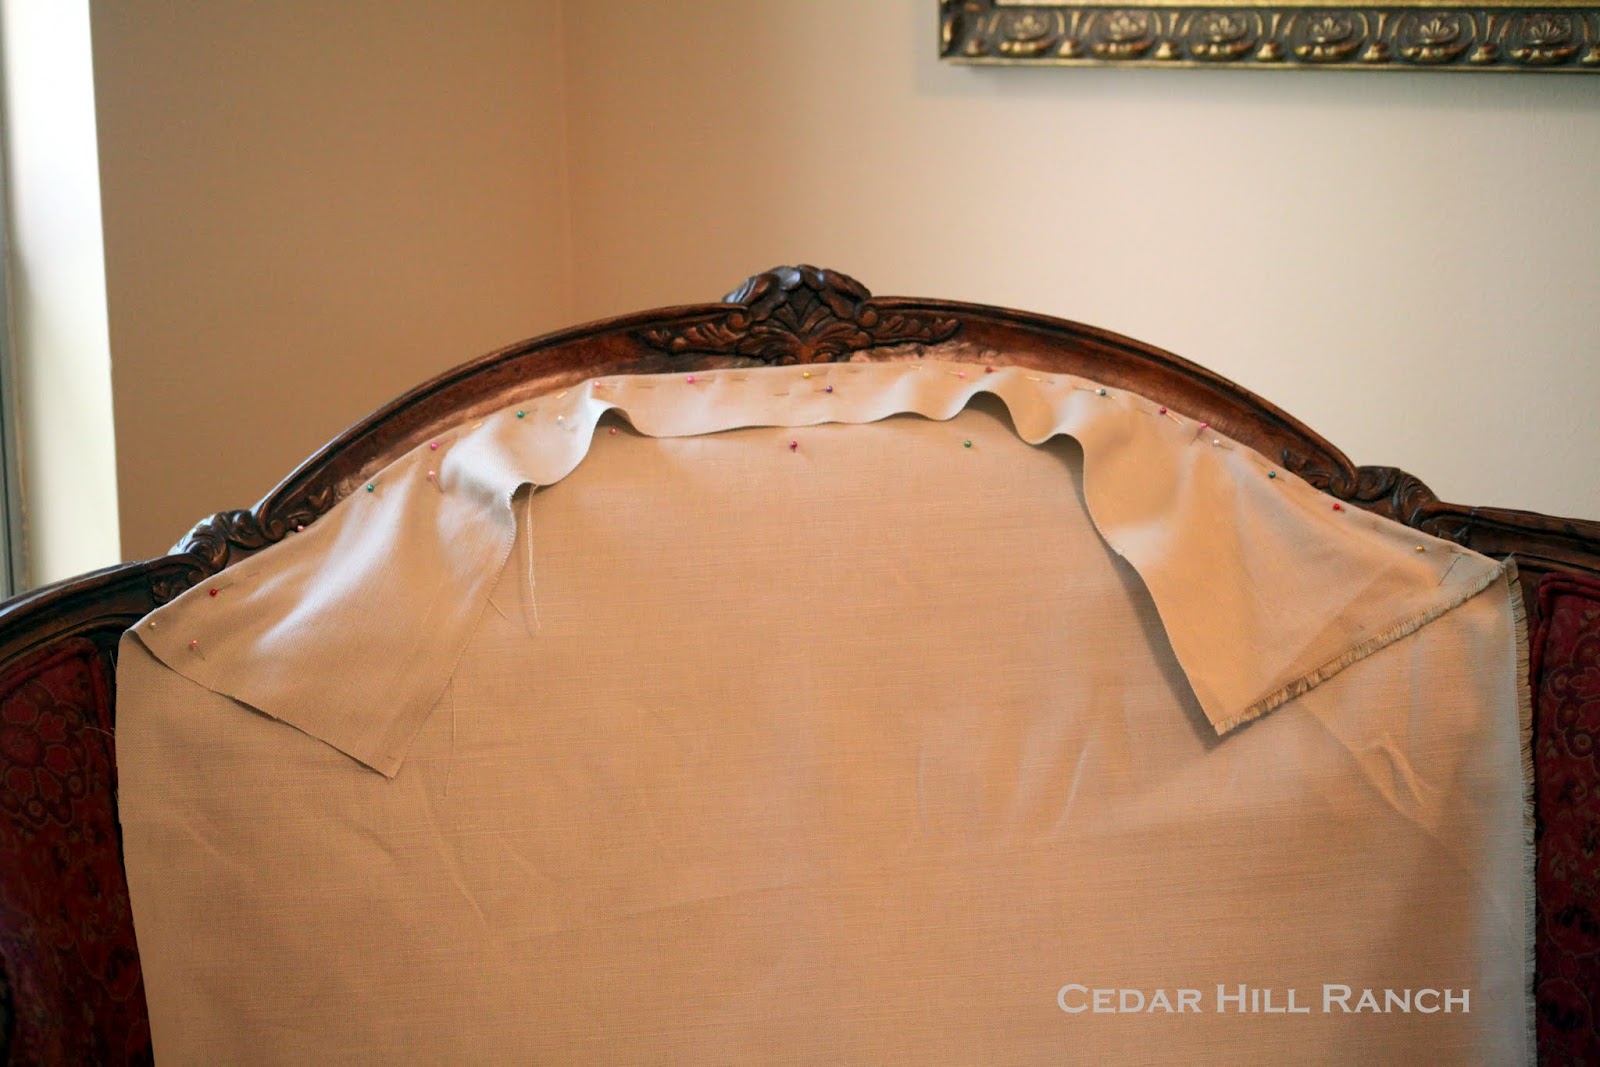
I like to do the main back piece next so the slipcover can begin to hold itself on my settee. Here you can see I have the fabric pinned on her back.
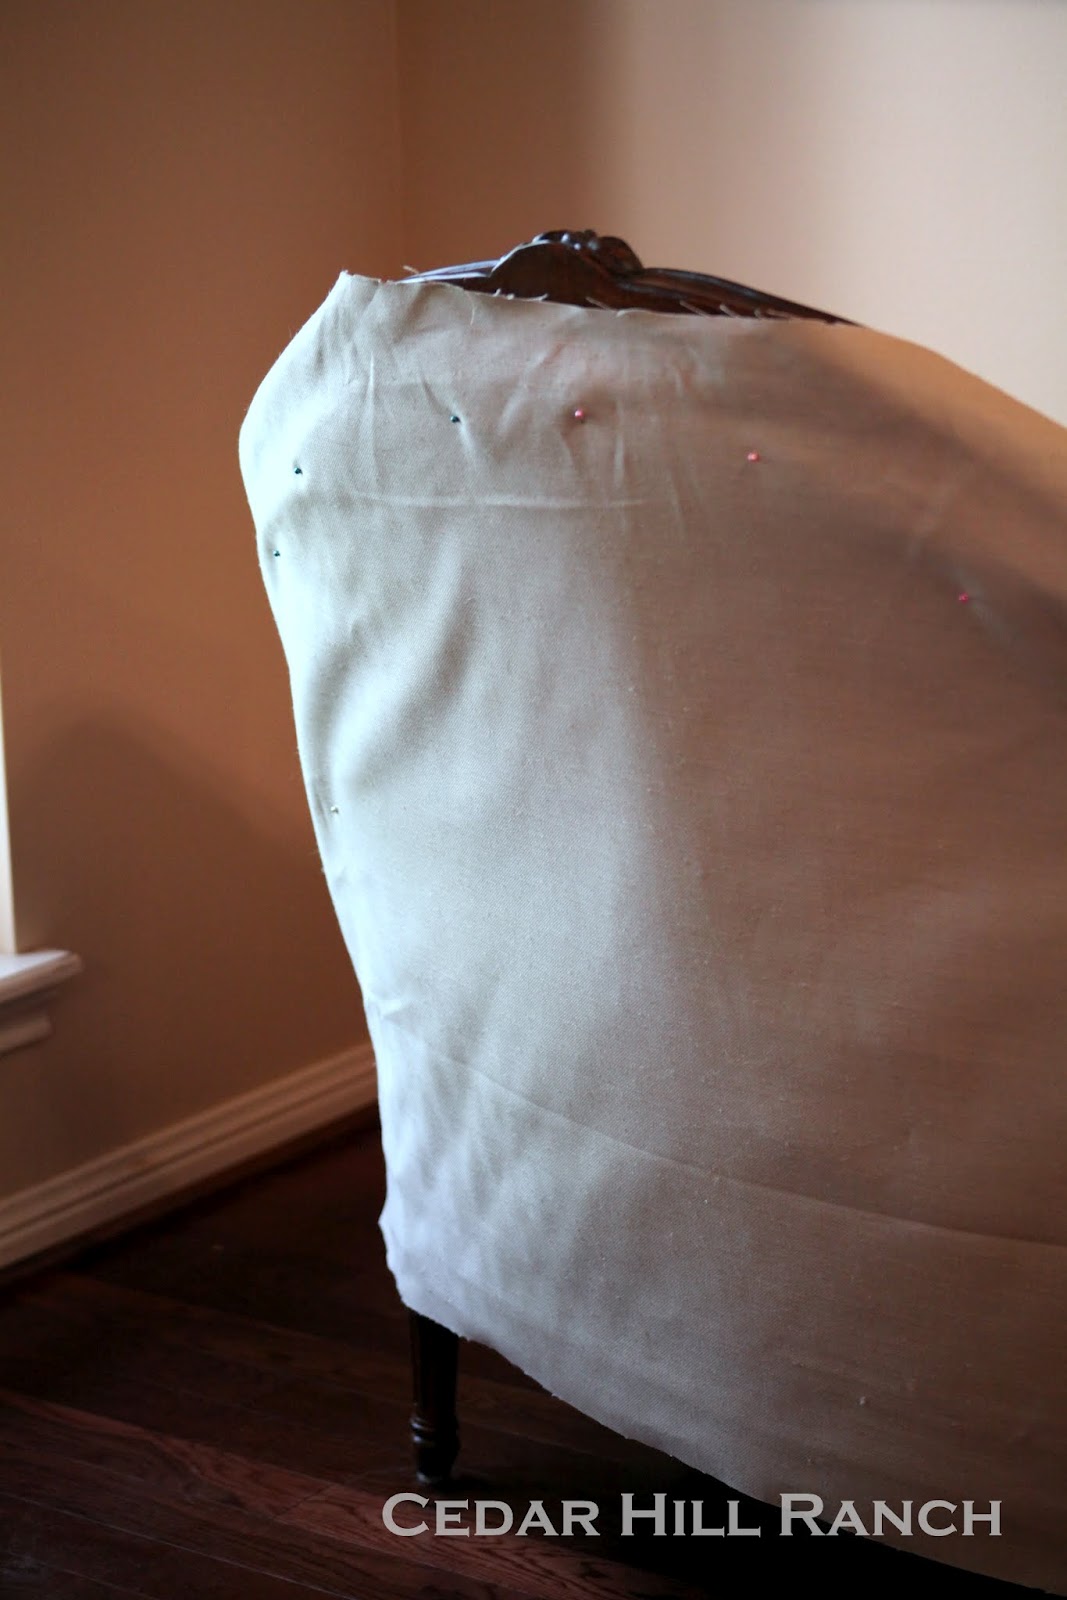
As with the front, I carefully folded the fabric over along the curve of her back.
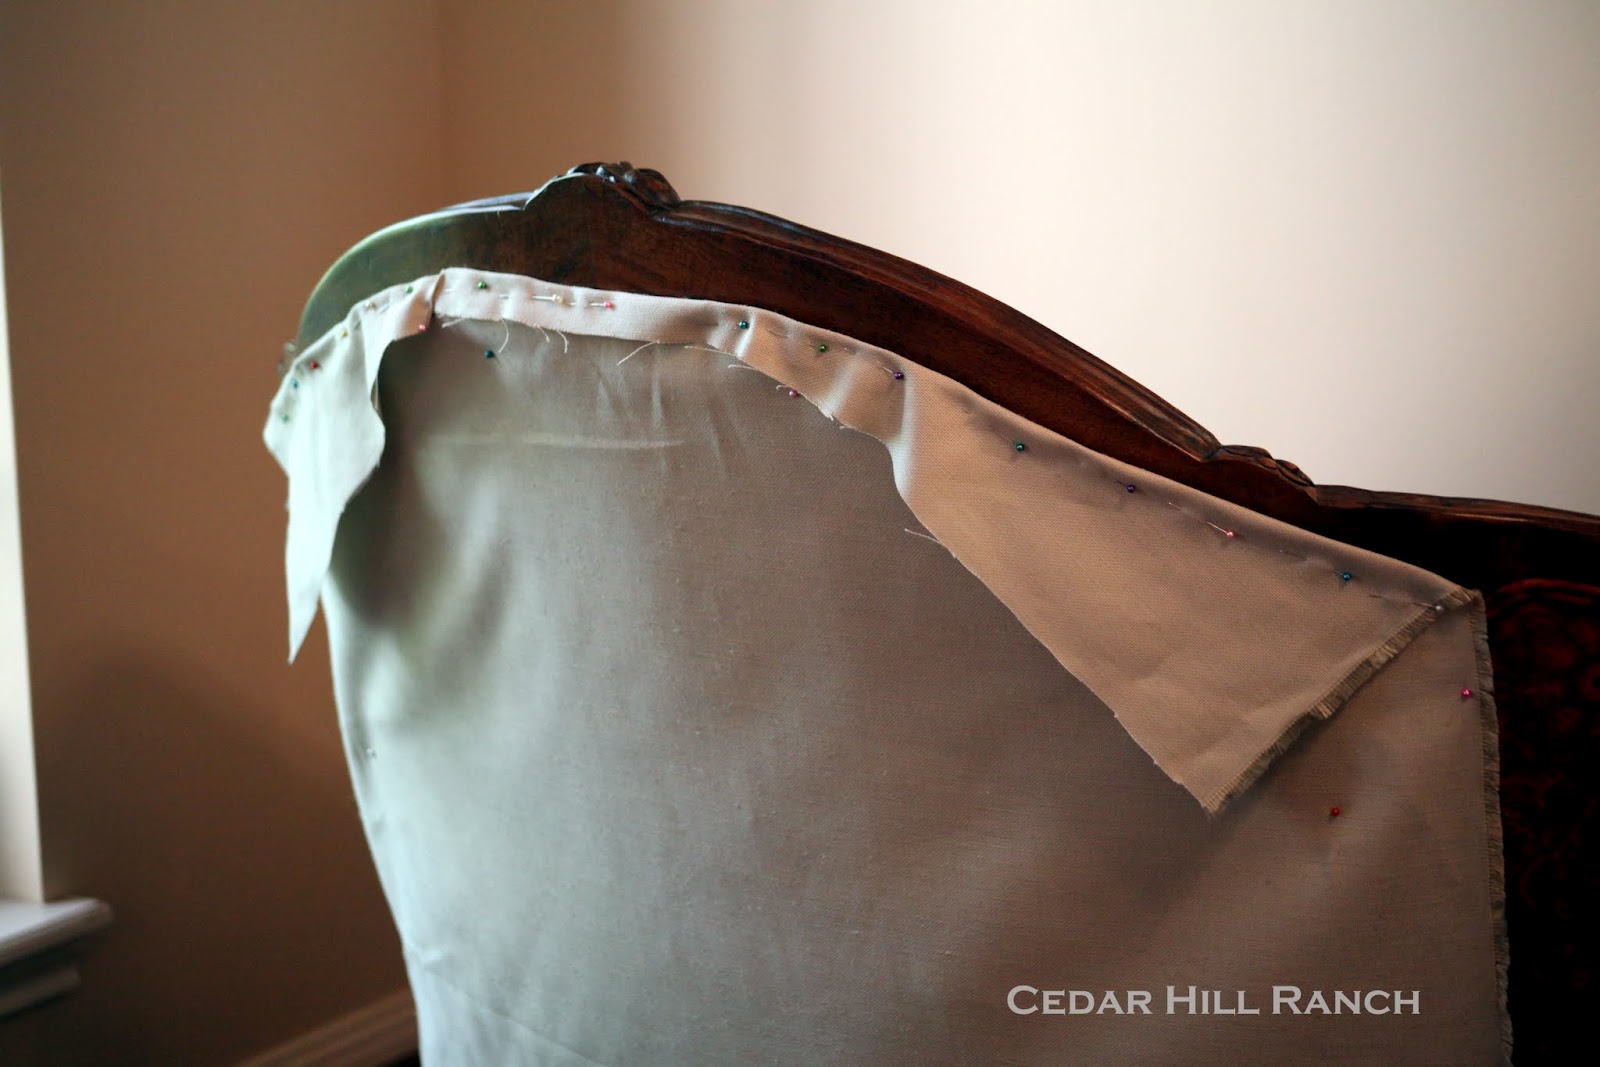
Then I attached the straps back here. You can see the seams have been sewn so that they won’t fray. Don’t worry, I have the slipcover on inside out. You won’t see all of that when I’m finished.
Using the settee as my pattern or form, the next thing I did was mold the fabric to follow the curve of Colette’s arm and made a straight seam attaching A to B.
I had to add a very wide strap to cover the fabric bracelet Colette wears on her arms.
I used drapery lining for the fabric that goes under the seat cushion that will be hidden.

I actually was so excited that I went on to work on the seat cushion before I finished the hem of Colette’s slipcover. I don’t think she minded, n’est-ce pas? Again, I draped the fabric over the cushion.

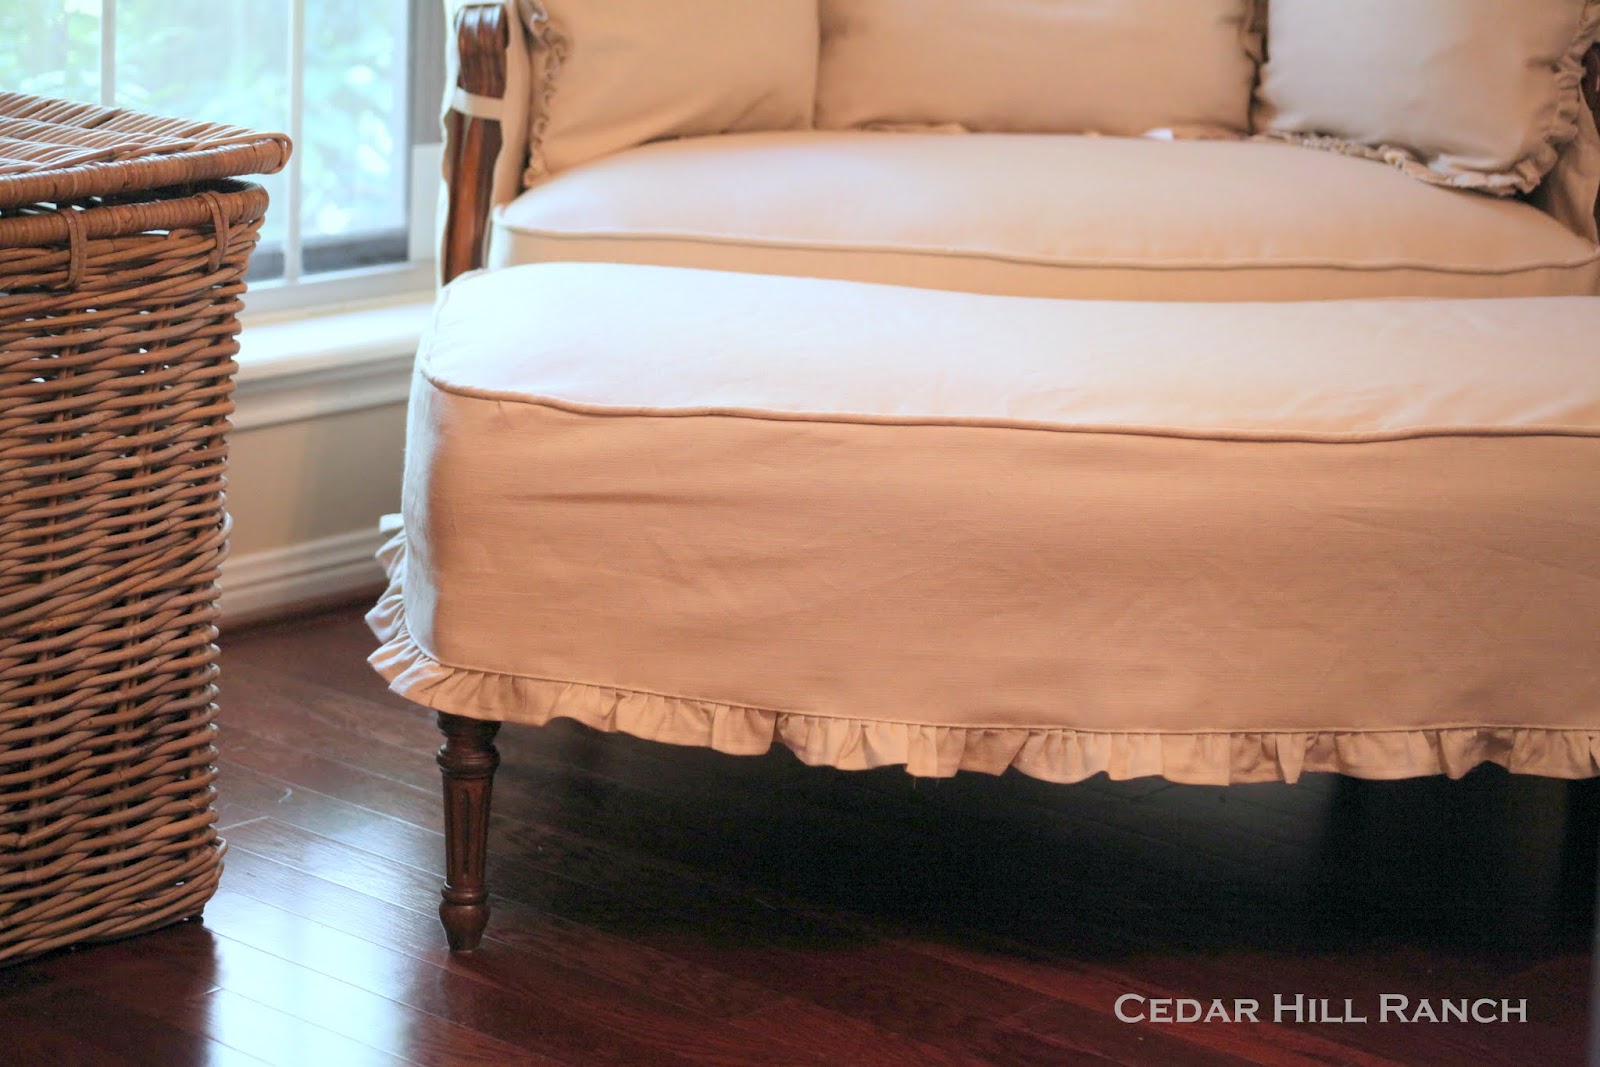
Now I had to make some piping, to go on the cushion. I used rope that you can find at the fabric store, and then needed 2 inch wide strips of fabric to cover it. I used the curve of the cushion to determine where to put the piping.
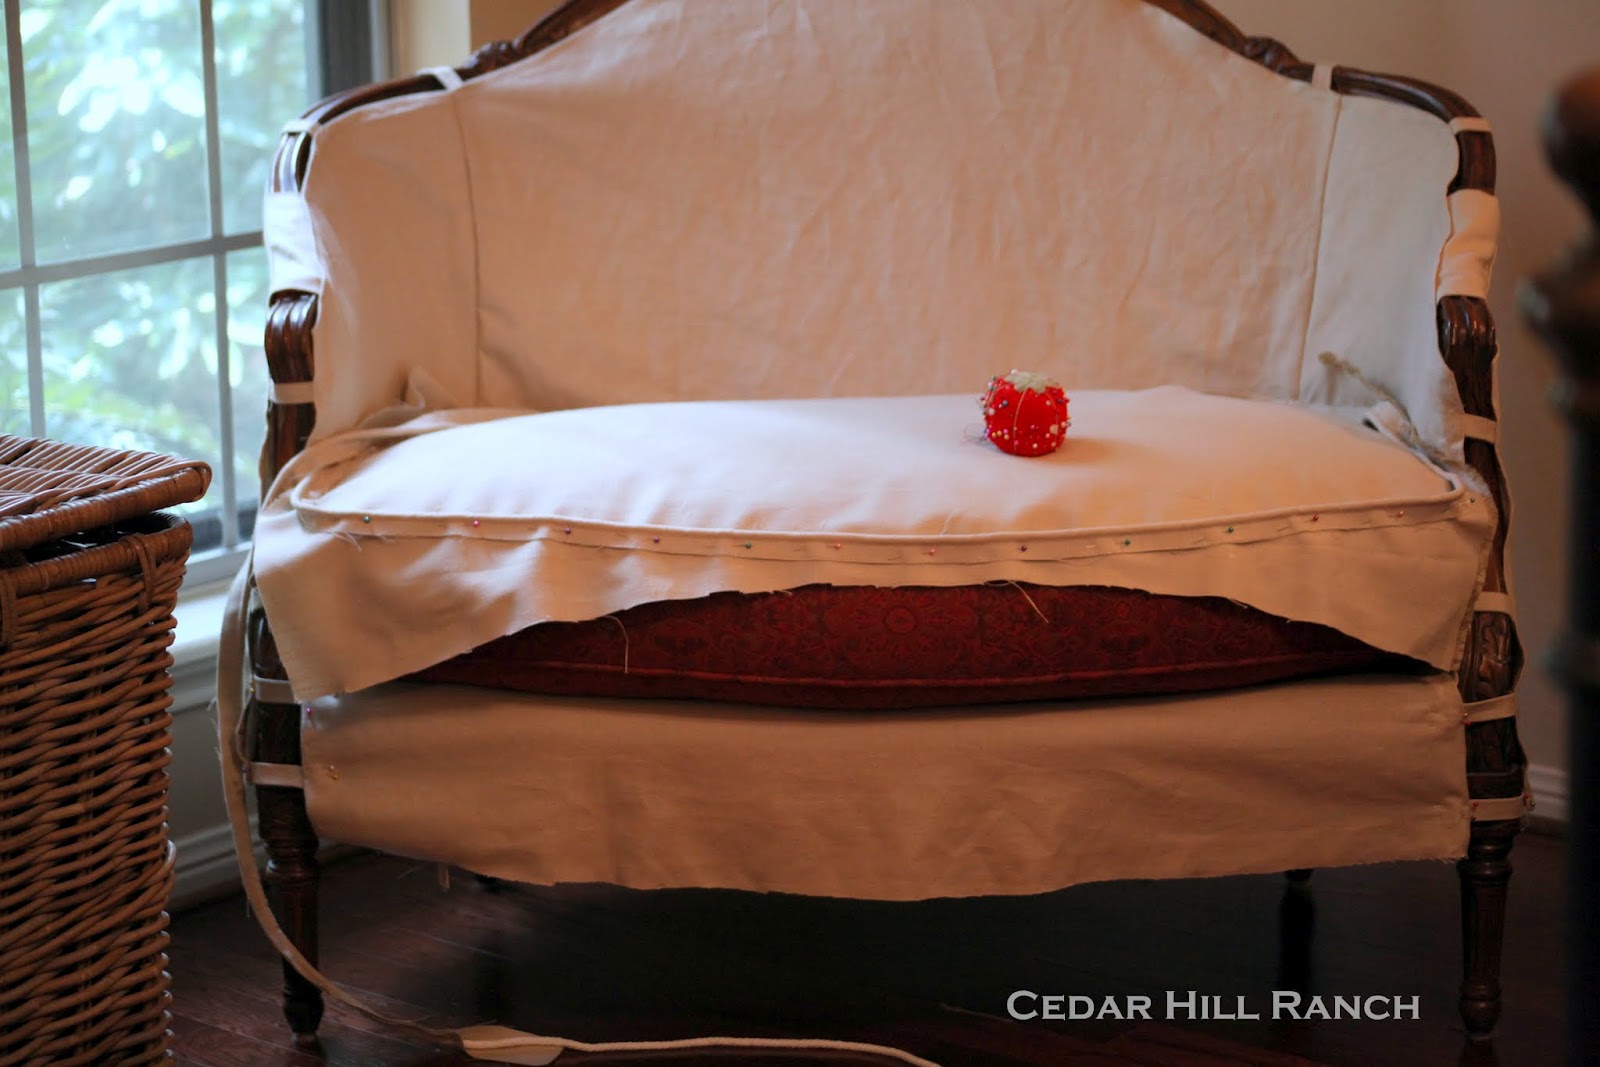
And now for a little secret. I use safety pins to secure the backs of my cushions. I like my fabric to be nice and tight, so Velcro will not hold, and I don’t have time to do zippers, which would be ideal. See how nice and tight the cushion fits?
Next onto the pillows. I did something here that I consider very naughty in the sewing world, I have never done this before, but I saw sometime similar on another blog. (And no Mom, if I saw someone jump over a bridge, I wouldn’t follow suit!) I saw some pillows on another blog, where the blogger pulled the thread to have a frayed edge on her pillows instead of a ruffle or piping. I did add a ruffle to these pillows, but left the edges to fray. I don’t even think most people will notice. I thought the ruffles would be shedding like crazy, but again, they look pretty darn great, and I didn’t spend hours hemming the ruffles.
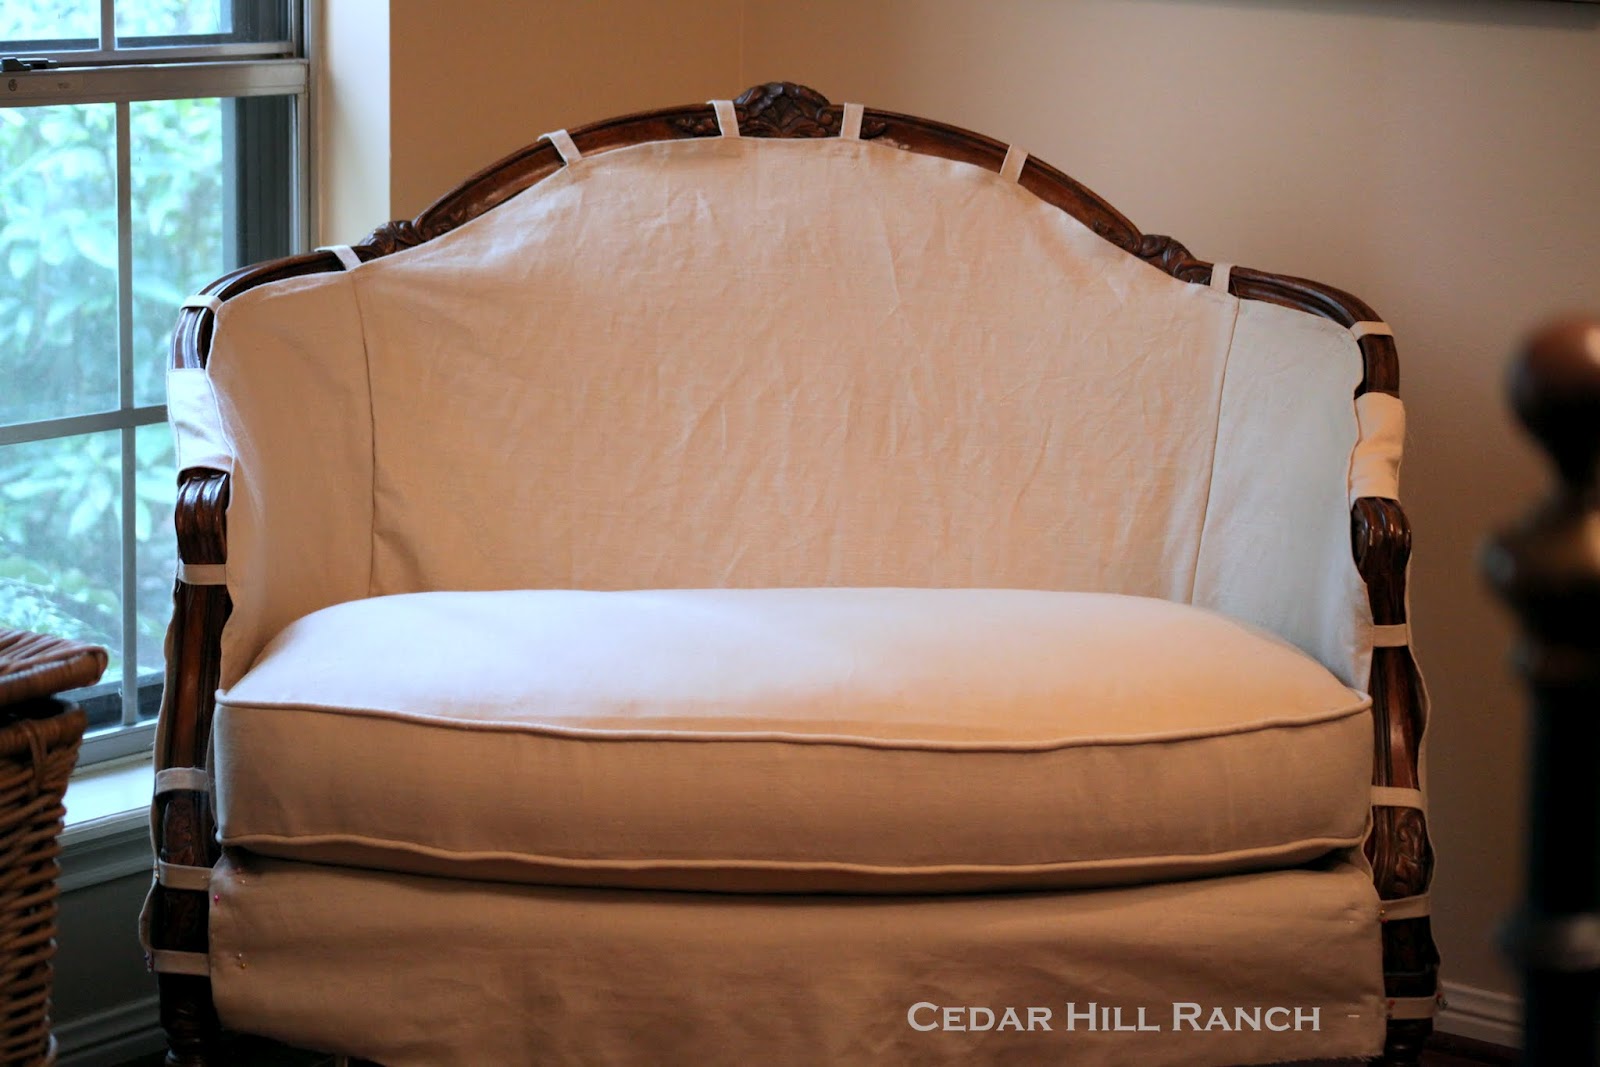
I finally hemmed the slipcover. Yes it is a little loose, but remember you won’t see this part once the ottoman is in place.
Next I worked on the ottoman using basically the same techniques as I used on the main slipcover. I did hem the edges of the ruffle on the ottoman though. For all of the ruffles, I used my ruffle attachment on my sewing m/c. Man that makes it go fast!!
The ruffler also makes the ruffle look so nice and neat.
\

For the closure on the pillows, I simply added ribbon to the bottom of the pillows. Some pillow closures in the back mean that the pillow always has a front and a back side, where the back never looks good. If you use a closure on the bottom, either side of the pillow can be used as the front.
I will also recommend here that you wash your fabric before you begin sewing. Sometimes I do and sometimes I don’t, depending on the project. I am the only one who sits on this chair, so I didn’t wash it first, also I didn’t want the fabric to be too wrinkly. But the linen I used to make the daybed cover on the back porch, I prewashed, and that turned out to be a very good decision, since I recently washed chocolate out of it.
Here is Colette again.
To see the roller shades I made for this room, click here.
To see the new bedding, click here.
I really am loving my bedroom’s new look so much I am considering taking up the habit of the old French court, receiving visitors in my boudoir.
Au revoir mes amis!
OK, Anita, this is fabulous! Your photos and directions are wonderful! You actually make it look easy, which it would never be for me. Love how it turned out, what a sassy little french girl she is, what a transformation!!
I’m sooo thrilled you shared this. I have a funky olive chair that is in sad shape and it needs a makeover like this! Beautiful work!
Kayli
Beautiful! How talented you are! I may have to make a slipcover now. Love your blog!
Anita, those are the cutest slips. Oh, how I wish I liked to sew. I break out in a sweat.
Love love love it Anita!! Wish I knew how to sew!
Elle est magnifique! She is beautiful. Such great detail and an entertaining tutorial. No wonder you love spending time in your room.
A very clever way to recover your couch, you did a fantastic job!
Oh I am pinning this for sure! I have never had the nerve to make a slipcover for anything but your method and drawings make it seem possible! I’ve been sewing since I was 9 and made untold numbers of curtains, comforters, outfits for my kids, etc. but something about slipcovers scares me to death!
Anita, your slip cover is gorgeous! How talented you are!! I tried to make a seat cover once, failed dramatically!
Oh my gosh- that is amazing!
I may try my hand at something easy first-
an ottoman?
You are amazing Anita!
Laura
White Spray Paint
WOW this is awesome!!! You have some skills and major patience! Beautifully done.
XO
Kristin
Anita, it turned out wonderful! Thank you for showing how you did it.
Anita,
Ooh~la~la! This is magnicifient! The transformation is amazing!!! What a stunning sette and ottoman!
Fondly,
Pat
Anita, These are the prettiest slipcovers ever! You did an amazing job.
Amazing transformation and you made it look so easy!!! And here I am trying to design sock monkey clothing. :@
Anita,
I am so grateful for this fabulous tutorial!!!!!It was so easy to understand. I have several pieces that I want to make covers for. You have given me the courage to give it a whirl!
Your Colette looks so fresh and modern and updated. Perfect!!!!
A big KUDOS to you! INSPIRATIONAL, dear friend!
Anita,
This is so flippin’ gorgeous! What a transformation! You are a master!
Okay, that looked super hard to me but I love how this turned out – over the top gorgeous!!
Ok, girl. You lost me at “Next, I measure…”. I’m not kidding….my head was spinning. You are tres talented, unbelievably so! Kudos on a beautiful, professional looking job. Love it.
Your slipcover is gorgeous!!! You make it seem so easy…..you almost have me convinced to try it myself…almost!!! LOL
Beautiful!!!!
~Des
Hi Anita, Your slipcovered settee and ottoman are beautiful. Your wonderful directions make it seem easy, but I know better. It takes a skill which you obviously have. So lovely!
Mary Alice
Hi Anita! All I can say is WOW!!! Thank you for sharing this tutorial…I am working up the nerve to make slipcovers for my wheatsheaf kitchen chairs….and look at what you made? I can definitely see the ‘engineer’ in you with your plans and technique!!! The makeover is just stunning – you must be loving and enjoying Collette so much more now!! Where did you buy your linen material? Do you think it would be a good choice for kitchen chairs?? Or might it wrinkle and stain too much (I have two boys!)…I am your newest follower – so glad I found your blog today! Please visit my blog sometime, I love to make new bloggy friends and follow me back if you would like to keep in touch! Heather @ settingforfour.blogpsot.com
I love Colette and want her in my house! Absolutely beautiful work on the slipcover!! Little Bit
you make it look so easy..I love this!
AMAZING! You are so talented. I’m in awe. I don’t think I would have had the guts to try a project like that. The end resutl is beautiful and I just love the small ruffles you added to the edge.
I’m at work eating my lunch and I just about choked on my sandwich! I am genuinely impressed beyond words. Well done girl! I am pinning this as soon as I get home. Our server here has the nerve to block Pinterest. Love the ruffles too. My machine is so old I’m not sure I could get an attachment but I’m sure going to try. Thanks for sharing!
You have made it look so easy! We need new covers for the boat cushions and I might just be tempted having seen how you did the seat cover.
The end result on Colette is gorgeous.
You’re one talented woman!
Brenda
Anita, love your sassy French Bergere chair and ottoman. Her new frock is lovely. I’m impressed that you taught yourself how to do this. The little ruffle on the ottoman is a fun touch. Thanks for sharing this. I don’t think I could ever do this even though you make it seem easy with your instructions. 😉
Colette est magnifique and you are a genius!I am so impressed. Yes, you should receive guests in your boudoir.
Awesome job, Anita. I’m sure visitors would love to hang out in your boudoir.
This was a WONDERFUL tutorial, Anita! Thank you so much for taking it slowly and clearly for us rookies. lol! I LOVE how Colette turned out. You did a great job!! 🙂
xoxo laurie
Wow, what a great tutorial, I am now going to do my two French chairs that I have been putting off for 6 years.
Thanks!!!!!!!
This couldn’t have come at a better time. I’m psyching myself up to slipcover a club chair in my living room. I really appreciate your instructions!
Collete est tres jolie, and I so enjoyed your descriptions of her.
Lisa
Wow! You are endlessly talented! I love all the details, and the detailed directions! Thank you so much for sharing. -K
Anita it’s gorgeous! Wow, very impressive. Loved your diagram. It looks like it took a lot of material and a lot of patience, but it turned out great! I love the straps. You wouldn’t want to cover up all that beautiful wood!
What a beautiful job you’ve done on these slip covers. The tutorial is fabulous and so well explained. Enjoy! Megan
It turned out just beautify Anita!
Anita your slipcover is tres jolie! Thank you for your how to.
I have to ask, do you cut your fabric on the bias when making piping?
I see a settee slipcover in my future.
This looks fabulous, and Colette was a beauty to begin with.
Loved the apology to your mother — I still do that although she has been gone 10 years, because she thought everything ought to look just as good on the wrong side as the top side. I used to tell her no one will see the back side, but she always said, “You’ll know.” When she was teaching me to sew, I spent half my time ripping out.
I need to finish my cover on a similar piece. I did it about two years ago and got sidetracked, which seems to happen a lot.
Gorgeous! Thanks so much for the tutorial. You actually make it seem possible to do this. 🙂
Hi, Anita! I am so very impressed. I know exactly how difficult and time consuming these types of projects are and you did an AMAZING job! Colette is just beautiful! I especially love how you made the straps so you can still see her lovely woodwork. LOVE IT!!!
Wow! This is beautiful!
Wish I could do this with my old couch…but I doubt my sewing skills are up to the task!
Lisa H.
You are quite handy!! This is gorgeous~love it! Angie
Wow! You did a fantastic job. Would love it if you shared at my furniture party
http://www.decoratinginsanity.com/2012/05/furniture-friday-16-and-features.html
xo….mONICa
Wow, wow, wow! Gorgeous! That’s such an amazing chair and you made it look so comfy and inviting. Thanks so much for sharing at Etcetorize this week!
Wow! Colette is now looking fantastic!! What a great tutorial! Thanks for sharing!
This is the best description of how to make this type of slipcovers. I want to make some just like this for my sofa and chair of similar style to Colette. (gosh…never thought to name my sofa and chair….I should) anyway…with this tutorial…I know I can do this…I totally get it. Great job explaining and your slipcover is gorgeous!
This is just fabulous, Anita! Beautiiiful!
I actually wanted to tell you that your link at ‘Passionately Artistic’ does not seem to be working.
Btw, you did a great job with the piano too.
Hugs
This is utterly amazing and just as beautiful!!! Great tutorial too although I still could not attempt it knowing how low my level of frustration is. Gorgeous……just gorgeous. xo
Anita, I am so in awe of you sewing abilities. You did a fantastic job and gave a very easy to understand tutorial. I don’t think I could do it even with those good photos. I chuckled when I saw your piece of paper with all the calculations on it. The engineer inside you just had to come out, didn’t it? My Dad is an engineer so I am familiar with calculations being done for every project. I just grab a hammer or whatever I need and go to work but he plans it out in his head, thinking of every angle, then he does his drawings and calculations. I just thought that was funny to see that in you, too. You are a very smart lady! Thanks for coming to my little ole party. I appreciate it.——– Shannon
love this! I am debating on upholstering vs. slipping a vintage chair I just bought….leaning towards the slip 🙂 I will pin this so when I’m ready I have a good tutorial! thank you! she’s a beaut!
That does look a little more challenging than most slipcover projects! But you did it and it is a wonderful job. I love the pillows too – adds just the right touch:) I just slipcovered a chair and today i started tearing apart the upholstery on a chair to reupholster it. First time for reupholstering – I may wish I had just slip covered this one too!
That does look a little more challenging than most slipcover projects! But you did it and it is a wonderful job. I love the pillows too – adds just the right touch:) I just slipcovered a chair and today i started tearing apart the upholstery on a chair to reupholster it. First time for reupholstering – I may wish I had just slip covered this one too!
Excellent job!!!!! Love, love, love linen:) Looks like I’ll be your newest follower….stumbled across you through Coastal Charm. Blessings~~Shine
Thank you so much for sharing. I am featuring this tomorrow at my party. Goes live at 5:00 EST.
beautiful beautiful beautiful project – love her name – sooooo very fitting. I think I MIGHT be able to do a slip with your awesome instructions….couldn’t ya just come over and play WITH me though (aka be my sewing mama!!) I’ll feed you yummy food & everything! xo
http://www.NorthernCottage.net
WOW! I can not believe how beautifully this turned out. I would love to be able to do this. I don’ think I’d be able to tackle this BIG project. Thanks for sharing. Yours is stunning. Charlene
Called me impressed! What a great tutorial … I have to pin this!
🙂
Linda
Hi Anita! I just think your pieces turned out so awesome that I had to feature your project at this week’s Make it Great party. Stop by to grab a featured button from the sidebar and I hope you’ll link up again! Have a wonderful week~
Anita,
I am a writer who aspires to sew. Your Colette tutorial drew me in like any good character should.
I have been smitten with the drop cloth slip cover of late, and while I don’t yet have the skill to pull off something so beautifully finished, it is something to which to aspire. Love it!
Warmest regards,
Lori
ABSOLUTELY GORGEOUS! Thank you so much for sharing! I have a french curved sectional couch and was wondering what I could do with it. Right now it’s tapestry and blue velvet. All FADED and out of style… I truly do LOVE LOVE LOVE what you did! :):)
Lynne Marie 🙂
i love the way you do this with the straps. i haven’t ever seen this before.
All I can say is WOW!! I wished I could be this talented!! Fab~U~LOUS job!
I love it. Thanks for sharing your skills! I am dying for that ruffle on the ottoman. Love your humor in the tutorial.
Emily
Hi there
Thank you SO much for this fantastic tutorial. I have been contemplating trying my hand at slip covering my three piece suite for months now, and I think you have finally given me the confidence to have a go at it. I’ve been sewing since I was young and am now 55, so I guess it’s a case of coming out of my comfort zone and trying my hand at something different. You’ve certainly made it look straightforward, and as the years have passed I’ve learned to be patient, so fingers crossed!!
Judi in the UK
Drinking my morning coffee and you have me giggling over Colette in the boudoir. Loved your instructions on Colette’s dress…she is more beautiful now. Your tutorial is very helpful, might try it sometime when I feel confident that I won’t ruin all that material by cutting to small. You do a wonderful job on all your slipcovered furniture.
Wow…love it. Have a question though about the safety pins. Are they used to hold the opening closed across the nack of the cushion? Or is the opening where the cushion meets the back of the safa? Confused anout that.
WOW Anita, you have done a fabulous job on this slip cover!! I would love to do a slip cover for my satee, but I’m just not sure I could do it. Thank you for taking the time to show us your technique for recovering. I love your posts and blogs.
I love this
Fabulous, wish I knew how to cover furniture like this. I love how plump and comfortable it looks. As always, you did wonderful
Love, love your slipcovers! Where did you find the fabric for this project?
So impressed by Colette’s change of wardrobe. I had wondered how you made that slipcover ever since the first time you posted her picture.
Wow!!! You did an amazing job!