I’m pretty excited that Cindy of Edith and Evelyn will be a contributor to Cedar Hill Farmhouse. You are going to LOVE her!! Here she is!!! Her first post is about grain sack chairs, my favorite!!!
There are two things that I dearly love and that’s grain sacks and french chairs. It’s even better when I can combine the two. I use antique grain sacks in a lot of upholstery projects, with the most recent being a set of french dining chairs. I found this great set of four chairs at an estate sale several months ago, but with all the renovations going on at our house, I hadn’t gotten around to updating them. But now that our dining room is nearing the end of it’s renovation, I decided that I had better get them finished!
The chairs were in great shape, they just needed a little updating! When buying used chairs, always make sure that they are sturdy, that you can sit on them, and turn them over to make sure that the springs are all intact. I’ve learned this the hard way! I have a couple of chairs that I picked up at estate sales that are beautiful……but you can’t sit on them! I didn’t do my due diligence, I just grabbed them because they were so pretty and a good price, but once home, realized what a mistake I had made. I now place books on them to deter someone from sitting there!
Here is what the four chairs looked like when we found them at the estate sale.
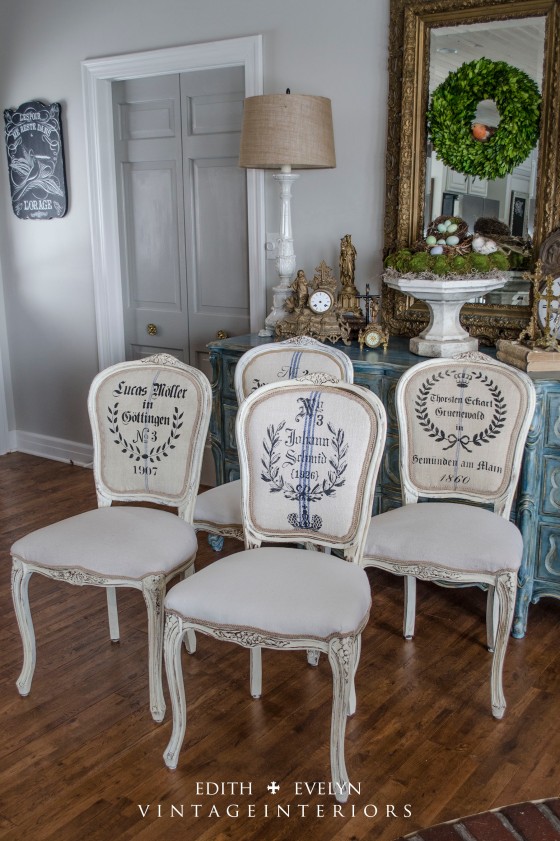
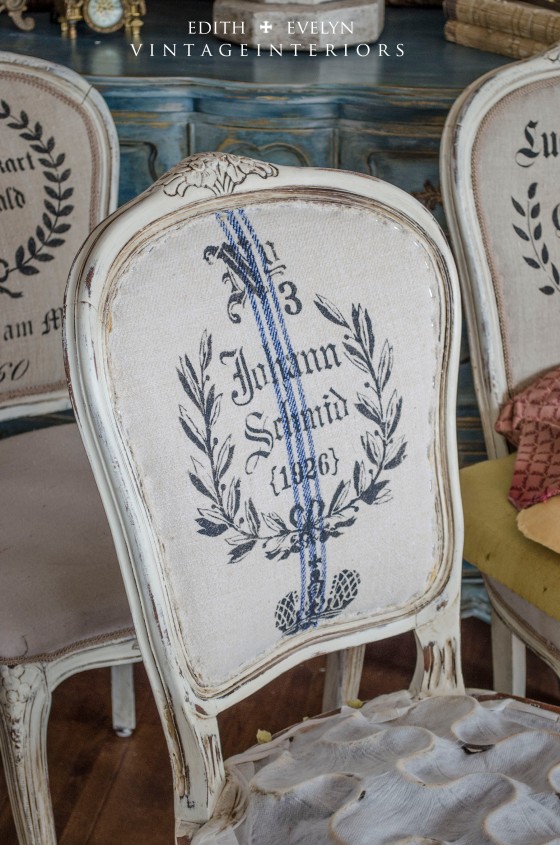
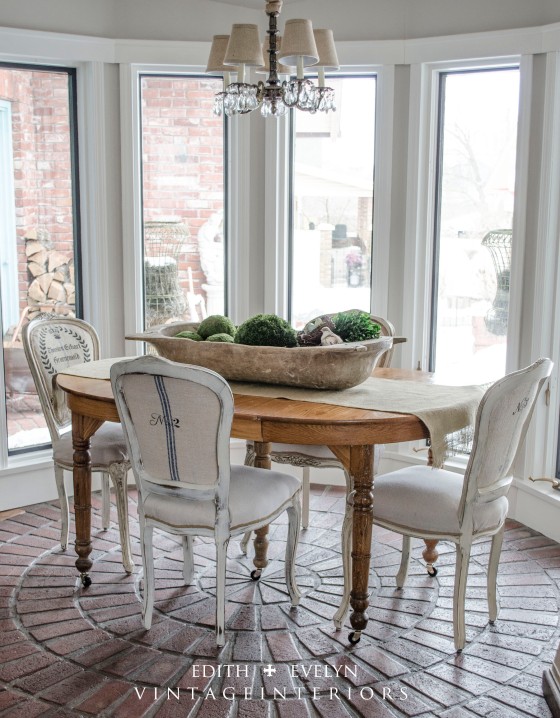
And here is what they look like after their transformation! It’s amazing what paint and new upholstery can do to bring a chair back to life! You can now see all the details in the wood.
I love how they turned out! I started by stripping the upholstery, and then giving them a couple coats of Annie Sloan Old White chalk paint. I also did some distressing and then waxed with clear and dark wax to bring out the details.
I keep a stash of vintage grain sacks that I try and pick up whenever I find them at a reasonable price, so I went through what I had and picked out two that had the look I wanted.
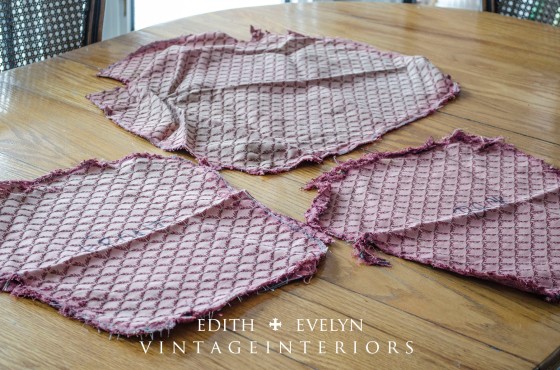
Using the old upholstery as a pattern, I cut out the new pieces for both sides of the back of the chair. To be on the safe side, I always cut about 1/2″ larger than the pattern and then trim off the excess once it’s stapled onto the chair. You can always cut too much fabric off, but you can’t add more if it’s too small. I know this from experience!
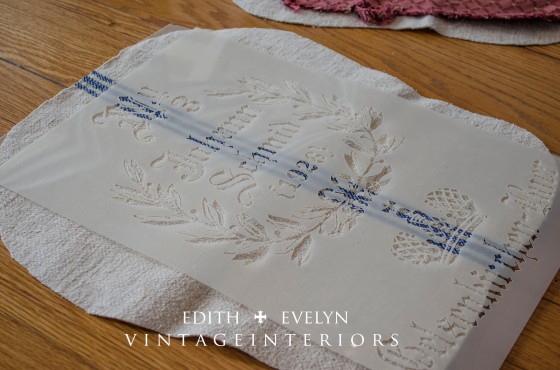
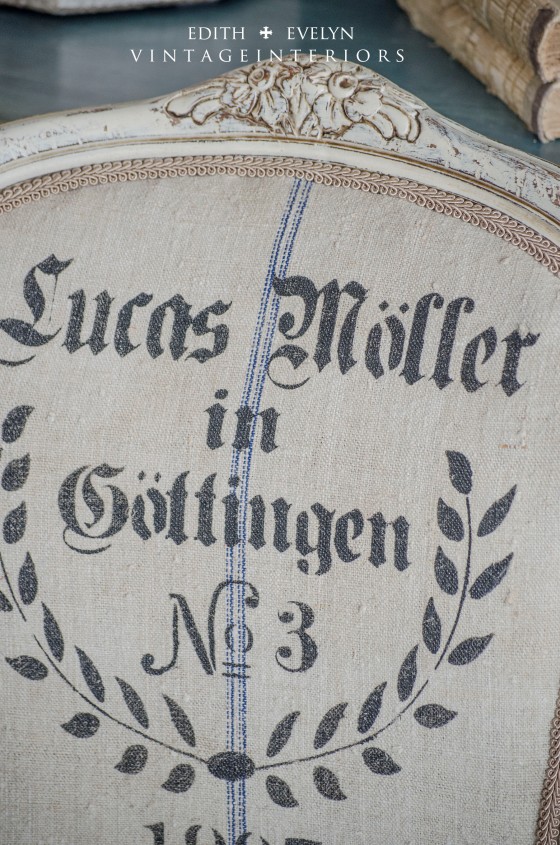
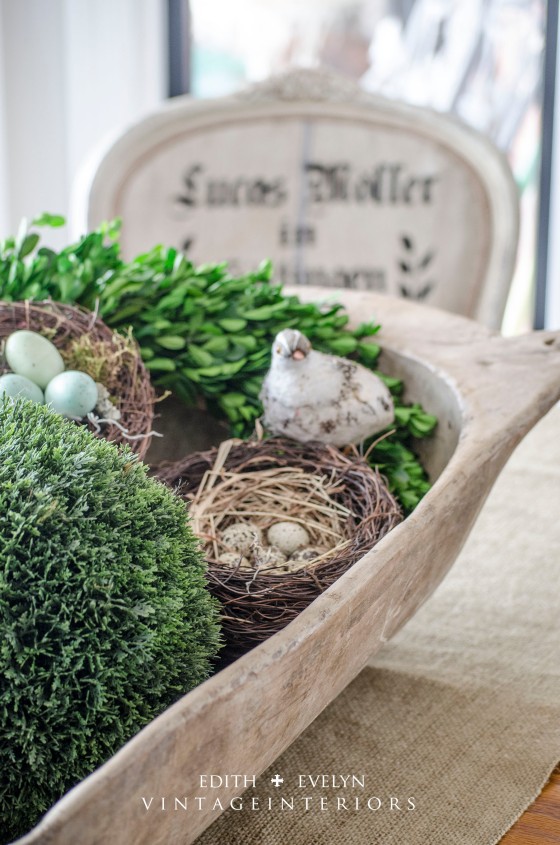
I love the graphics on antique German grain sacks that have the farmers names and dates stamped on them. But they are extremely expensive and rarely have I ever taken the leap to pay what they are going for. I knew that I could get the same look by using a stencil and stamping the graphic onto the vintage grain sacks.
I got the stencils from Maison de Stencils. They have a huge selection of stencils and they are extremely well made. Mine have lasted a long time and I’ve used them over and over with no issues.
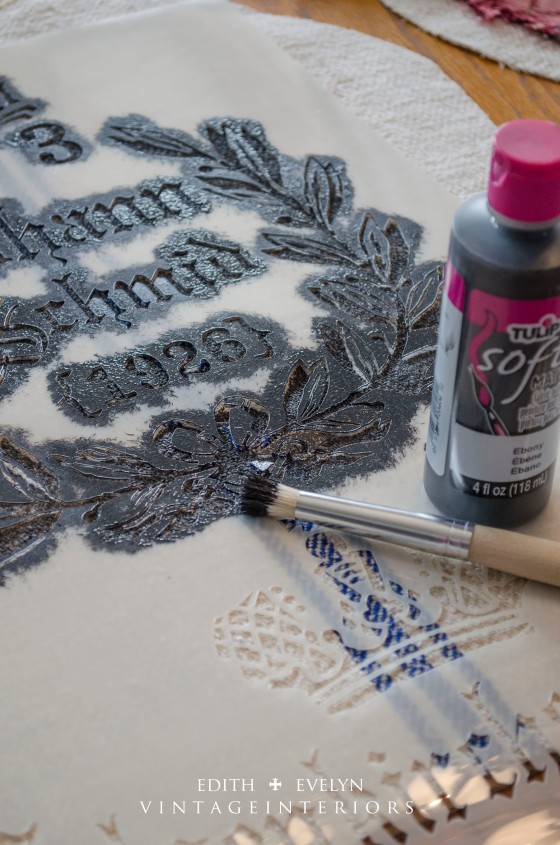
Using a black fabric paint from Hobby Lobby and a stencil brush, I placed the stencil in the correct position and stamped it with the fabric paint. I then carefully lifted the stencil and waited a few minutes for the paint to dry, then stapled the grain sack into the back of the dining chair.
Once it was stapled into the back of the chair using a staple gun, I trimmed off the excess fabric.
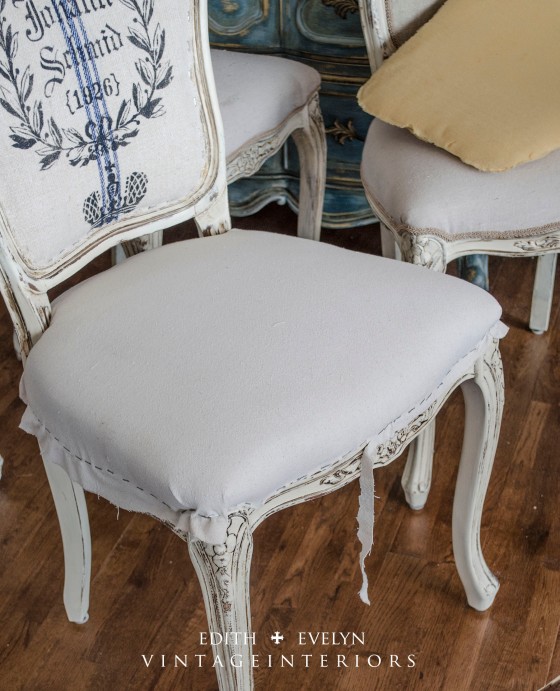
Using a drop cloth for the seat, I cut out the pattern, again using the old upholstery as a guide, and stapled it onto the seat of the chair.
Once everything was stapled and trimmed, I covered the raw edges and staples with gimp trim, again from Hobby Lobby. I used a hot glue gun to adhere the gimp.
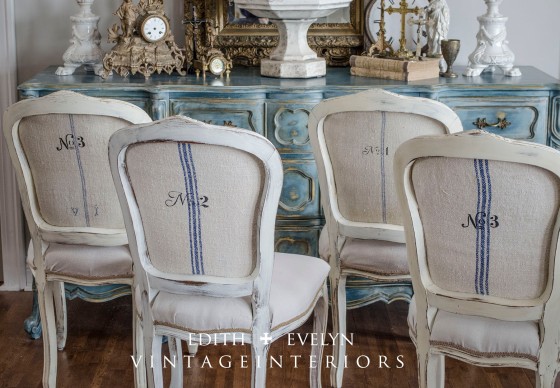
I love how they turned out, all of them being just slightly different.
The backs also received a stamped number, and one of the grain sacks was monogrammed with “VI” which also shows on the back. I love all those little details.
The vintage grain sacks aren’t terribly difficult to find, but they can run the gamut on prices. You can find lots of them on Ebay and Etsy, and at most of the larger antique shows such as Scotts in Atlanta and Roundtop in Texas. I usually buy mine from an European importer in Alabama, who seems to have the best prices of any I’ve seen. The only issue is that he does not ship so you have to actually go there to buy them.
The same look can be created by using reproduction grain sacks from Online Fabric Store or upholstery grade burlap from Save on Crafts. Using drop cloth and painting the stripes on, would also give a similar look.
I placed the four chairs around my old farm table in the breakfast nook to see how they looked, but they will eventually be going into the dining room, once that room is ready for furniture.
I have a weakness for French chairs and find it difficult to walk away from any that I find at a good price, so the garage seems to have quite a few stacked up out there! Those will be getting some updates over the next few months. Getting this set finished has inspired me to get started on the rest of them!
I hope you have enjoyed this little transformation! I would love to hear from you so let me know if you have questions!
Cheers,
Cindy
This was written by Cindy of Edith and Evelyn.














So happy to see Cindy over here! 🙂 Wow these chairs are amazing!! I wouldn’t have known you used a stencil on them. Great job! I have been keeping an eye out for a set of these kind chairs. Thanks for the tutorial, I will be using it!!
Thank you Misty! Good luck on finding your chairs, I can’t wait to see what you do with them!
I only recently found Cindy’s blog and I am thrilled to see her here at Cedar Hill! The chairs are fabulous!
Thank you Jan!
Beautiful!! I wonder at the stage where you showed stapling the front to the back, there was no photo of what was in between and how did you attach the back? Perhaps it is obvious to some, I am the overly concrete kind, where I need every little step explained?
I enjoyed your post very much! I live in the North East with no places to find fabulous grain sacks!!
Molly
What a great tutorial! love the look, with each chair being slightly differen! beautiful job!
Thank you Debra!
Just discovered you Cindy. The chairs look amazing! So happy to get to know you.
Irene
Thank you Irene! So lovely to “meet” you!
Beautiful, Cindy! I would have never thought these were stenciled.
xx,
Sherry
Thank you Sherry!
Happy to see you over here at Anita’s blog…love your chairs. I too, buy sacks from Charles. Maybe I should try to stencil one of mine.
Blessings,
Linda
Thank you Linda! Charles’ place is like “grain sack heaven” isn’t it?!? I never visit without bringing home a stack! You should try the stenciling on some of the grain sacks for a whole different look!
Where is Charles Place?
I live in Ga.
Cindy, the chairs are great and you did a fantastic job with pics every step of the way. Great tutorial! Maybe I should start a business going to “that place” in Alabama and shipping the grain sacks- Oh wait a minute, you’re doing that over at your shop on Etsy! I’ll just stick to denim…
Congrats on the guest post!
Judy
Thank you Judy! You should absolutely sell/ship those grain sacks! I discontinued selling them because I wanted to keep them all! There’s a good chance I may be on the edge of a “grain sack hoarder”…..along with hoarding French chairs! I wish Charles would ship but after numerous discussions with him, he still won’t budge! I could steer a lot of business your way! Just a thought……
I’ve seen your chairs already on one of your social media sites, and I have to say, the stencils fooled me! They look fantastic. And wonderful article, by the way 🙂
Thank you Mary!
Hi, Cindy….. I am so excited to find your fabulous blog and see all of your gorgeous French inspirations coming to life! Loved the tutorial on the French chairs. It was most helpful and I will definitely put the information to good use. Of course, thanks to Anita for sharing you with us!!!!
I would like to know where in Alabama “Charles” is located as I lived in Montgomery until just recently. I know there are a lot of wonderful dealers/designers in the Cullman/Florence, AL areas and wondering if he could be there.
Thank you Barbara! The “Charles” that I spoke of is Charles Phillips Antiques and Architecturals in Mobile, AL. Charles imports from Europe and brings in several containers a year, and usually has a wonderful selection of vintage European grain sacks. You have to go his location in Mobile to buy because unfortunately, he won’t ship. But it’s definitely worth the trip!
Thank you so much for sharing the helpful information on the importer in Mobile!!! It’s actually about a 3 hour drive from Montgomery so I will definitely check it out!!! 🙂
Love the final look on the chairs. Thanks for the tips about the stencils and fabric.
Thank you Sally!
I have to agree with everyone else the chairs are fabulous! I purchased 8 chairs just like these that I want to do the same look to. I just had a couple quick questions. I was wondering if you put anything between the fabric of the backs of the chairs? Also, is ” Charles ” the name of the store where you purchased the grain sacks from? I would like to purchase some for my chairs as well. I follow you on Facebook and have purchased from your etsy. I absolutely loved your kitchen update, and your recently updated dinning room! Both of them are stunning! Thank you for inspiring me to do my own chairs!
Thank you Rita! There is a piece of foam between the front and back layers to give it a little padding. “Charles” is Charles Phillips Antiques and Architecturals in Mobile, AL. You have to buy directly from his location, unfortunately he does not ship.
The chairs look fabulous! I was wondering how you attached the fabric on the back of the chairs. Thanks!
Thank you Beth! I originally tried “sandwiching” the front and back covers, with foam in between, and then stapling all of it into the chair frame back. It was difficult to hold, and I ended up with the back piece not bing “taut” enough. What I found that worked better was to take the back piece only and using a glue gun, glue it in place into the chair frame. Then I placed the foam and the front cover in place and stapled.
Thank you so much for your reply Cindy – I really appreciate it!
So gorgeous! I love everything about them! Also, I love those floors under your table! Thanks so much for sharing!
Thank you Jesse!
You make it look so easy so, i guess i will find out,thank you so much, They truly are lovely.
Thank you Marlene!
Cindy — those are certainly beautiful chairs. I absolutely love everything about them!
I am going to be looking for some antique grain sacks, but have no idea what I should pay for them. Any help in this area would be so appreciated. Thanks, and it was a real pleasure to see your post .
Thank you Melanie! Antique grain sacks can run a variety of prices, a lot depends on the condition, the age, and if there are any graphics on them. Some can run into the hundreds of dollars….yikes! I can’t afford that kind of investment and then cut them up to use for upholstery! I think a good average price for a vintage sack without any graphics on it is $45-$65 ea. Still a little pricey, but the great thing is that they are usually a good size and when opened you get double the material. Usually one grain sack will cover one dining chair. The best prices I have seen on the grain sacks is from an European import company in Mobile, AL (Charles Phillips Antiques and Architecturals)…..this is where I buy all mine……they are fabulous prices ($20 ea). The only issue is that they absolutely will NOT ship, you have to buy in person. But you should be able to find some great deals online, Ebay or Etsy is a great source. Let me know if you have any other questions!
Hi Cindy!!! Just little ole me from Mobile!!! Congrats on your new Monthly Contributor blog!!! I follow you religiously and love your design and style!! And thanks to Anita at Cedar Hill Farm for highlighting your Blog and your tutorials!!! You know I LOVE your work and the chairs are truly stunning! Question, I’ve never used fabric paint or stencils because I’ve always been afraid how they hold up to continued use on the fabric!! I’ve wanted to try something simple like personalized napkins first. Not much expense and I have visions of people laying them on their lap and paint transferring off!!! Yikes!!! Any tricks to the fabric paint???? Do you seal it some way or just let it dry?
Blessings, Anna
Hi Sweet Anna! Thank you for your kind words, they mean so much to me! I use fabric paint from Hobby Lobby (Michael’s probably has it too). It is a permanent paint and it dries very quickly. I have never had any issues with it at all. I have even used it on pillows before and have washed the covers after a period of time. The paint faded very slightly but it didn’t bleed. I haven’t had any issues with the paint transferring off once it’s dried on the fabric. Definitely try it on the napkins and see how it does, I think you’ll be surprised!
Wonderful post! The chairs are resplendent! As a fellow grain sack hoarder/lover i was pleasantly surprised to learn that the sacks were stenciled. Thanks for the link to the stencils! FYI: for those living in the Atlanta area, there is a dealer from Auburn, Al who comes monthly to the Scott Antique Market who sells her grain sacks for about $30 each. On Etsy, I’ve splurged for some rare light grey striped rolls from a seller called grainsack. She lives in Austria so it takes a while to receive but they are all A+ quality. I’ve also snagged a few things from your A+ Etsy shop and am always so happy with the items. The great care you take in packaging receives my applause☺
And lastly, watching your home transform, room by room is like receiving the newest long-awaited sequel from your favorite author!
Thanks for the inspiration you share so beautifully with the world.
Aww, Sue, thank you for those sweet words, they mean so much to me! Thank you so much for the info on the seller at Scott’s! The last time I was there, the only grain sack seller was selling them at pretty high prices…..$30 is a wonderful price!
Just a thought but why not use the drop cloth for the fronts and backs also and just stencil the stripes with painters tape? I doubt most people would even notice the difference.
Hi Julia! Yes, drop cloths could have been done for the entire project very easily. I just have a stash of grain sacks and love the nubby texture of them. However, the drop cloths are a good alternative. I’m going to be doing a post soon showing a French chair upholstered with the “faux” grain sacks made from drop cloths! Thanks so much for your comment!
I can’t wait to see it. I loved how relatively easy this project looked. Thanks so much!
Absolutely amazing! Love, love, love those chairs. You did a fabulous job!!
Thank you!
Beautiful! I’ve been drooling over the antique grain sacks for a while and never thought about using a stencil. Pretty brilliant!
Thank you Barbara!
Fabulous job on the chairs! I absolutely love them.
Thank you Erika!
I found your blog the other day which led to your Etsy shop which led to a wonderful purchase. I’m now patiently – or maybe not so patiently – awaiting the arrival of a wonderful vintage french basket. Even more amazing is your shop is only a couple of hours from me and I can’t wait to visit some time soon. These chairs look fantastic, and I am looking forward to seeing them in your dining room.
Thank you Jeannie! I love the French basket you purchased and it will be on it’s way to you very soon!
What a great tutorial! Pinning for later future project definitely! Kudos ladies wonderful job they are beautiful!
Thank you Brenda!
In the past fabric paints recomended washing the faric first to remove any sizing or products added to the fabric. Did you wash the grain sacks?
Beautiful Job,beautiful work on your home….keep going on your dream!
Thank you Vicki! Yes, I always wash the grain sacks prior to using!
Absolutely beautiful!! Love the chairs and the instructions are very detailed and easy to understand!
Thank you Nilza!
GORGEOUS! I too recently found your site. I love all your painted pieces in your home. Did you use Annie Sloan chalk paint on all of your projects? I remember seeing the book, Colour Recipes for Painted Furniture and More by Annie Sloan you mentioned for your inspiration in painting your gray cabinet. I want to paint like you! Would you recommend getting this book or any of her books for learning the process to achieve these results?
Thank you for sharing this transformation. Amazing! I now want grain sacks!
Hi Pamela! Thank you for all your kind comments! Yes, Annie Sloan is my chalk paint of choice. I know there are tons of other brands out there, but I use Annie Sloan. I just love the depth of her colors. If you are just starting out using ASCP, then yes, I would recommend picking up one of her books. They are a wonderful resource for using different colors and layering them together to achieve an old world look!
Those chairs turned out beautiful! Thanks Cindy for sharing You did a terrific job redoing them.
l love the work you have done on the chairs, do you know of anyone who would sell the same sort of chair already done. they are just what l have been looking for.
Thank you Zelda! Unfortunately, I don’t know anyone that has the same sort of chair for sale.
i love this tutorial. And I love her blog. I got to view this twice since I am a follower of both of yours. Thanks for a wonderful post. Di
Hi Cindy
I have “folders” on my computer and have one especially for you! So about every other day I open up this tutorial and just stare at because I love these chairs so much!! Not too weird, huh?
I live in St. Louis, MO. Slim picking here as I’ve been looking for chairs like these forever! Did you use 4 different stencils? Looks like you did.
Also, where on God’s green earth can I find grain sacks like these?
I’m quite the fan, guess you figured that by now.
I’ll check back… and will take ANY advice you can offer. Many thanks!
Mary Syron
mary.syron@att.net
Mary, I have some in stock right now. http://shop.cedarhillfarmhouse.com/collections/all/grainsack
Hi Cindy,
I too just found your blog and am obsessed! My home is continually evolving. I also paint with AS and have done many pieces. I love DIY projects and flea markets.
I love, love all the rooms you have redone and decorated. Totally my look. Great job on these chairs, and I can’t wait to find some just like them for me to redo!! Thank you for your inspiration. We have a great antique flea market in northern CA that sells the grain sacks.
Where did you find the different stencils ?
I have them in my shop http://shop.cedarhillfarmhouse.com/collections/all/grainsack
She mentions where she got hem in the article.
Ok… this article may have just pushed me over the edge to use the grain sacks I’ve had, but have been hesitant to cut up and use….. Beautiful job, the chairs are stunning…
Oh, and may I say the photography is top notch!! Love the ‘in progress’ pictures!
Gracias disfrute las sillas esta claro , la explicación espero un día realizar mi sueño y poder hacerlas yo felicitaciones soy su admiradora.
Cindy, the chairs are beautiful! I love grain sacks and usually pay about $50 for them. $20….a real deal!
This is one of the most elegant refinishing projects I have seen! I wonder if I have it in me to figure out how to properly refinish an item to get these results!!!!!!! 🙂
BEAUTIFUL WORK!!!
Absolutely stunning! Love them
These look amazing! I would so love to do something like this. You make it look so simple. Thank you for the tutorial.
these chairs are fabulous !!
So beautiful!! I have passed up many chairs because of fabric color! Thanks for showing us how it’s done.
Thank you so very much for the tutorial! I have a beatiful chair in my garage that needs to be redone, and now I have the process down! My chair also has a little fabric on the arms, so I’m assuming I cover that the same way as the seat and back. I think I’m ready to tackle this now, thanks to your helpful insight. Your chair are gorgeous!
I love, love, LOVE this transformation! So beautiful!
Thank you Cindy for sharing your gorgeous chairs. Thanks to Anita I have just now discovered your blog. You and Anita have my mind exploding with ideas. Can’t wait to get started on my own stenciling,because I love this look!!!
Oh My Goodness!! These chairs are absolutely to die for! They are just breathtaking! I haven’t had the guts to try this and do some simple upholstering. Maybe this will give me the incentive.
Beautiful! I love how the paint treatment brought out the pretty woodwork. Thanks for the tips on recreating if you can’t find grain-sack ! Very gorgeous work !!
Beautiful work! I love your chairs. I have a set of “french” DR chairs that started out oak, got painted espresso, and I recently chalk painted them a very pale sage (I thought it was cream, but turned out to be green). I happened to have some linen upholstery fabric in the exact same color. They looked good, but not amazing. When I found your tutorial I knew what I would do! My daughter created personalized stencils in the Grain Sack motif, and voila! I had to put the stencils on the seat, as the backs of the chairs are wooden, but the look is similar. Thank you for the inspiration. Wish I could include a picture!
Oh Linda, that sound so wonderful!!! I am so glad you found something of value here. I bet your room is stunning!!